

Check out what’s coming up!
If you like my cool tool that I use to open DSP:

Check out what’s coming up!
If you like my cool tool that I use to open DSP:

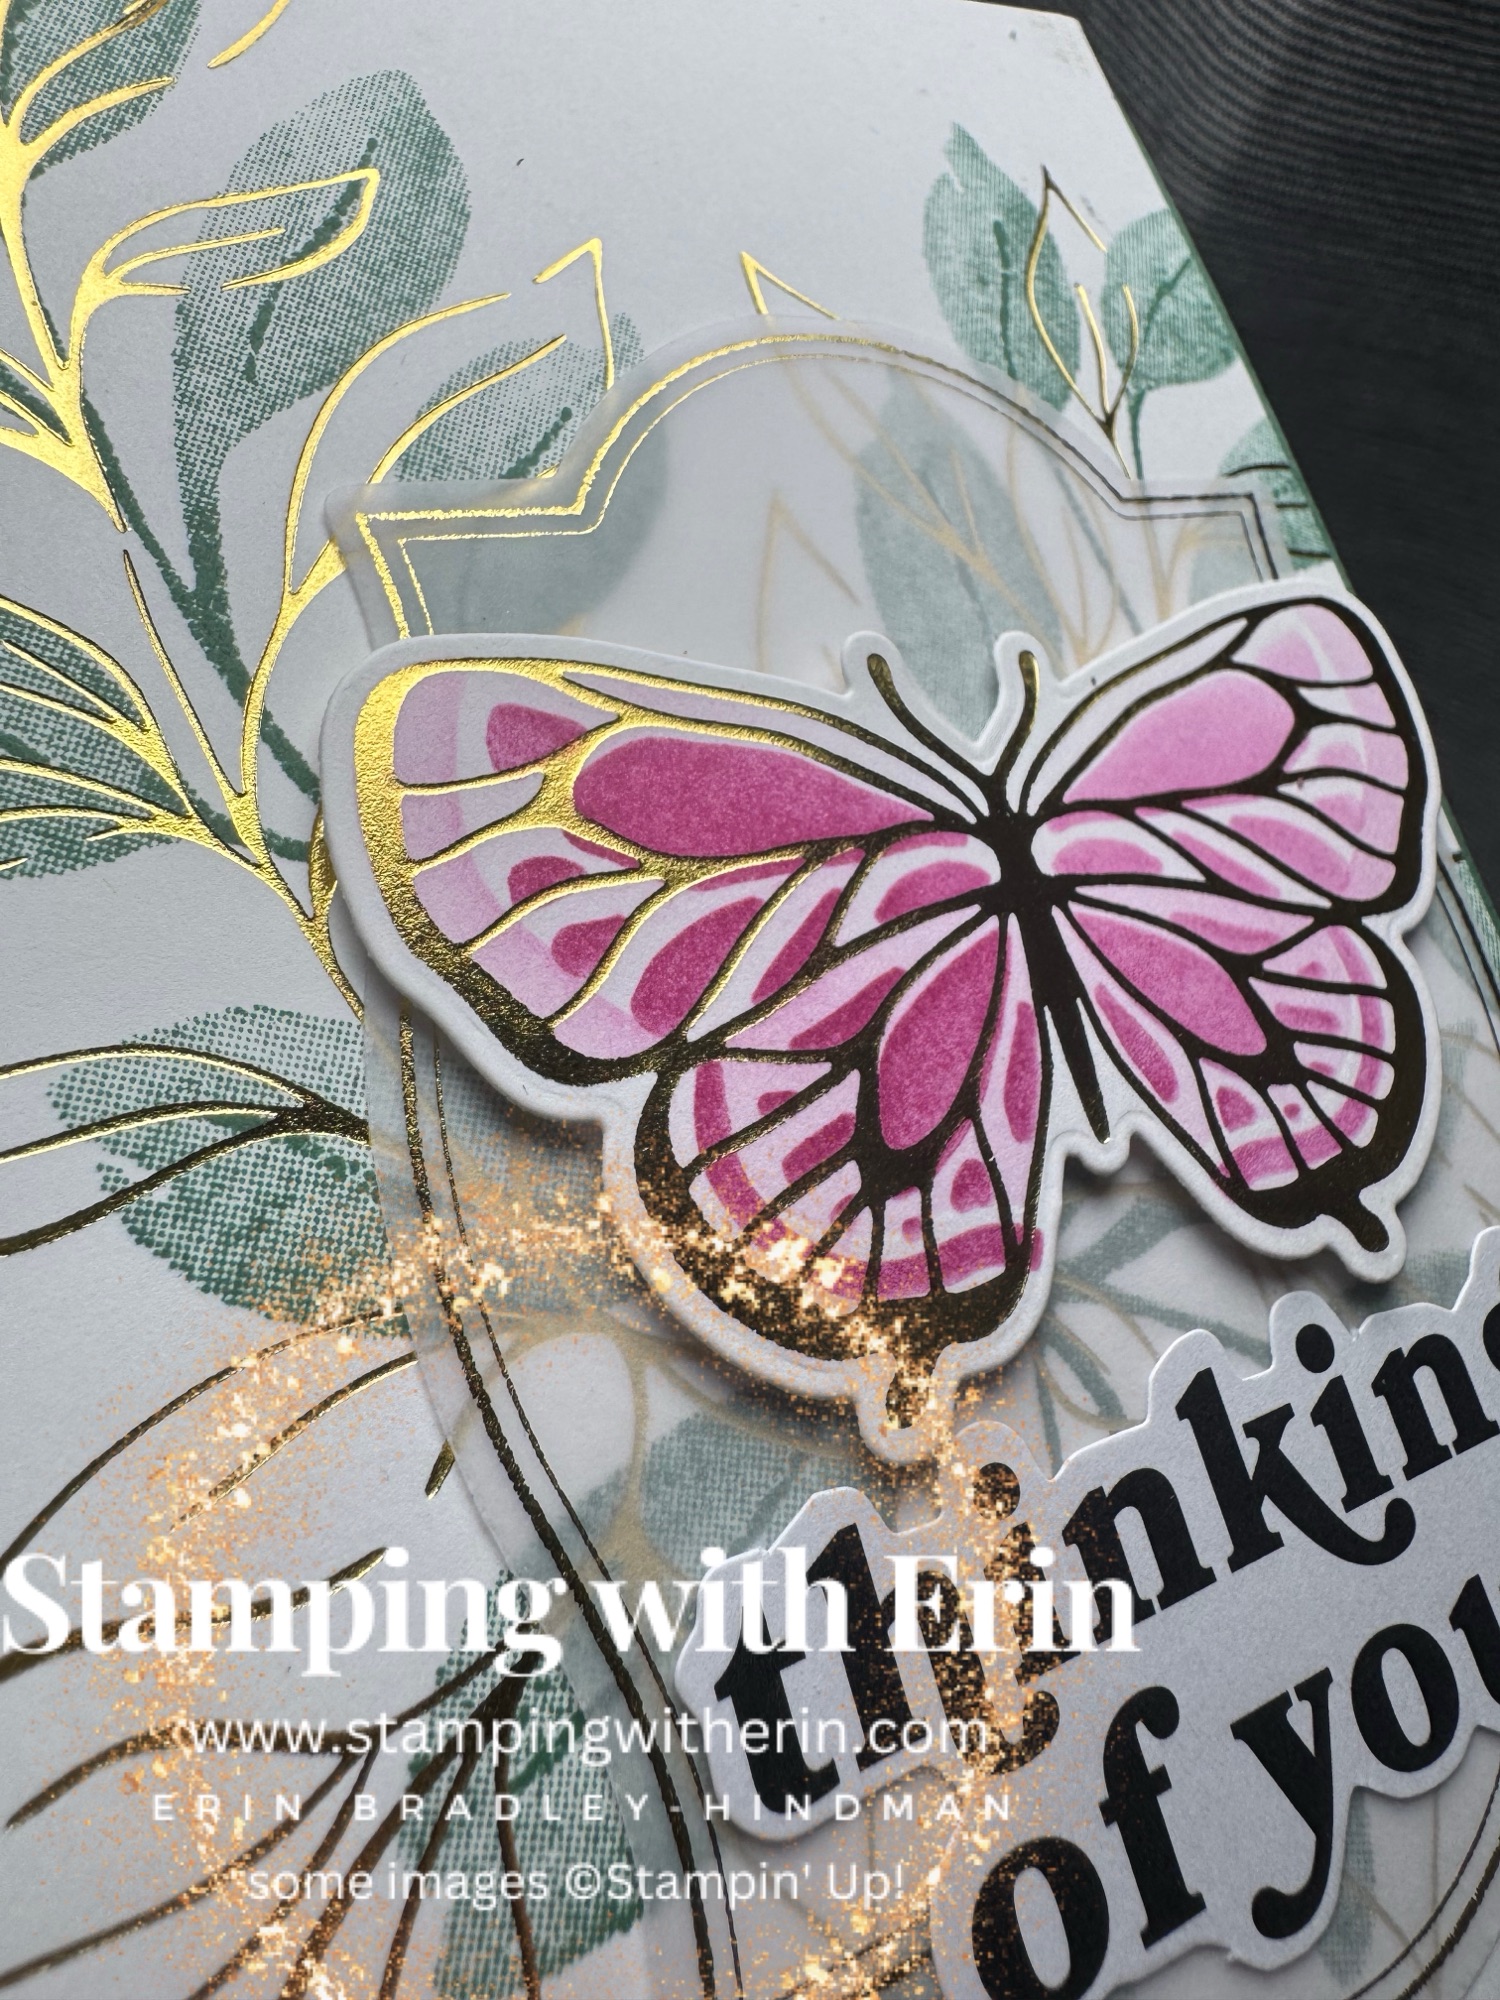
So much gold on these cards! I used three different Hot Foil sets on it. Once you get the hang of it, it becomes easier and your cards are WOW!
Here’s the video:
Non SU products:
Transfer Glue (perfect for masks/stencils)
Product List

Just click on the picture above to see the Reel.
These Fun Fold Spanner cards are fun! You can find the measurements on my “Instructions”.
Product List
First, click on that picture to see the Reel! Those spinning ghosts are so dang cute!
To get the spinners click on this picture:

Product List
Click on the picture below to see all the products!

And check out my last FB Reel- I used the Hot Foil!

It’s really hard to get a picture that shows the foil, but here’s one that shows it a little better:

And, here’s a video showing how I made this card and introduce the Hot Foil System:
Starting this Friday, July 10th, everyone can order the products to make STUNNING projects!
Click on this picture to see all the products available:

In my Butterfly card, I used three new products:
Let me know if you have any questions!

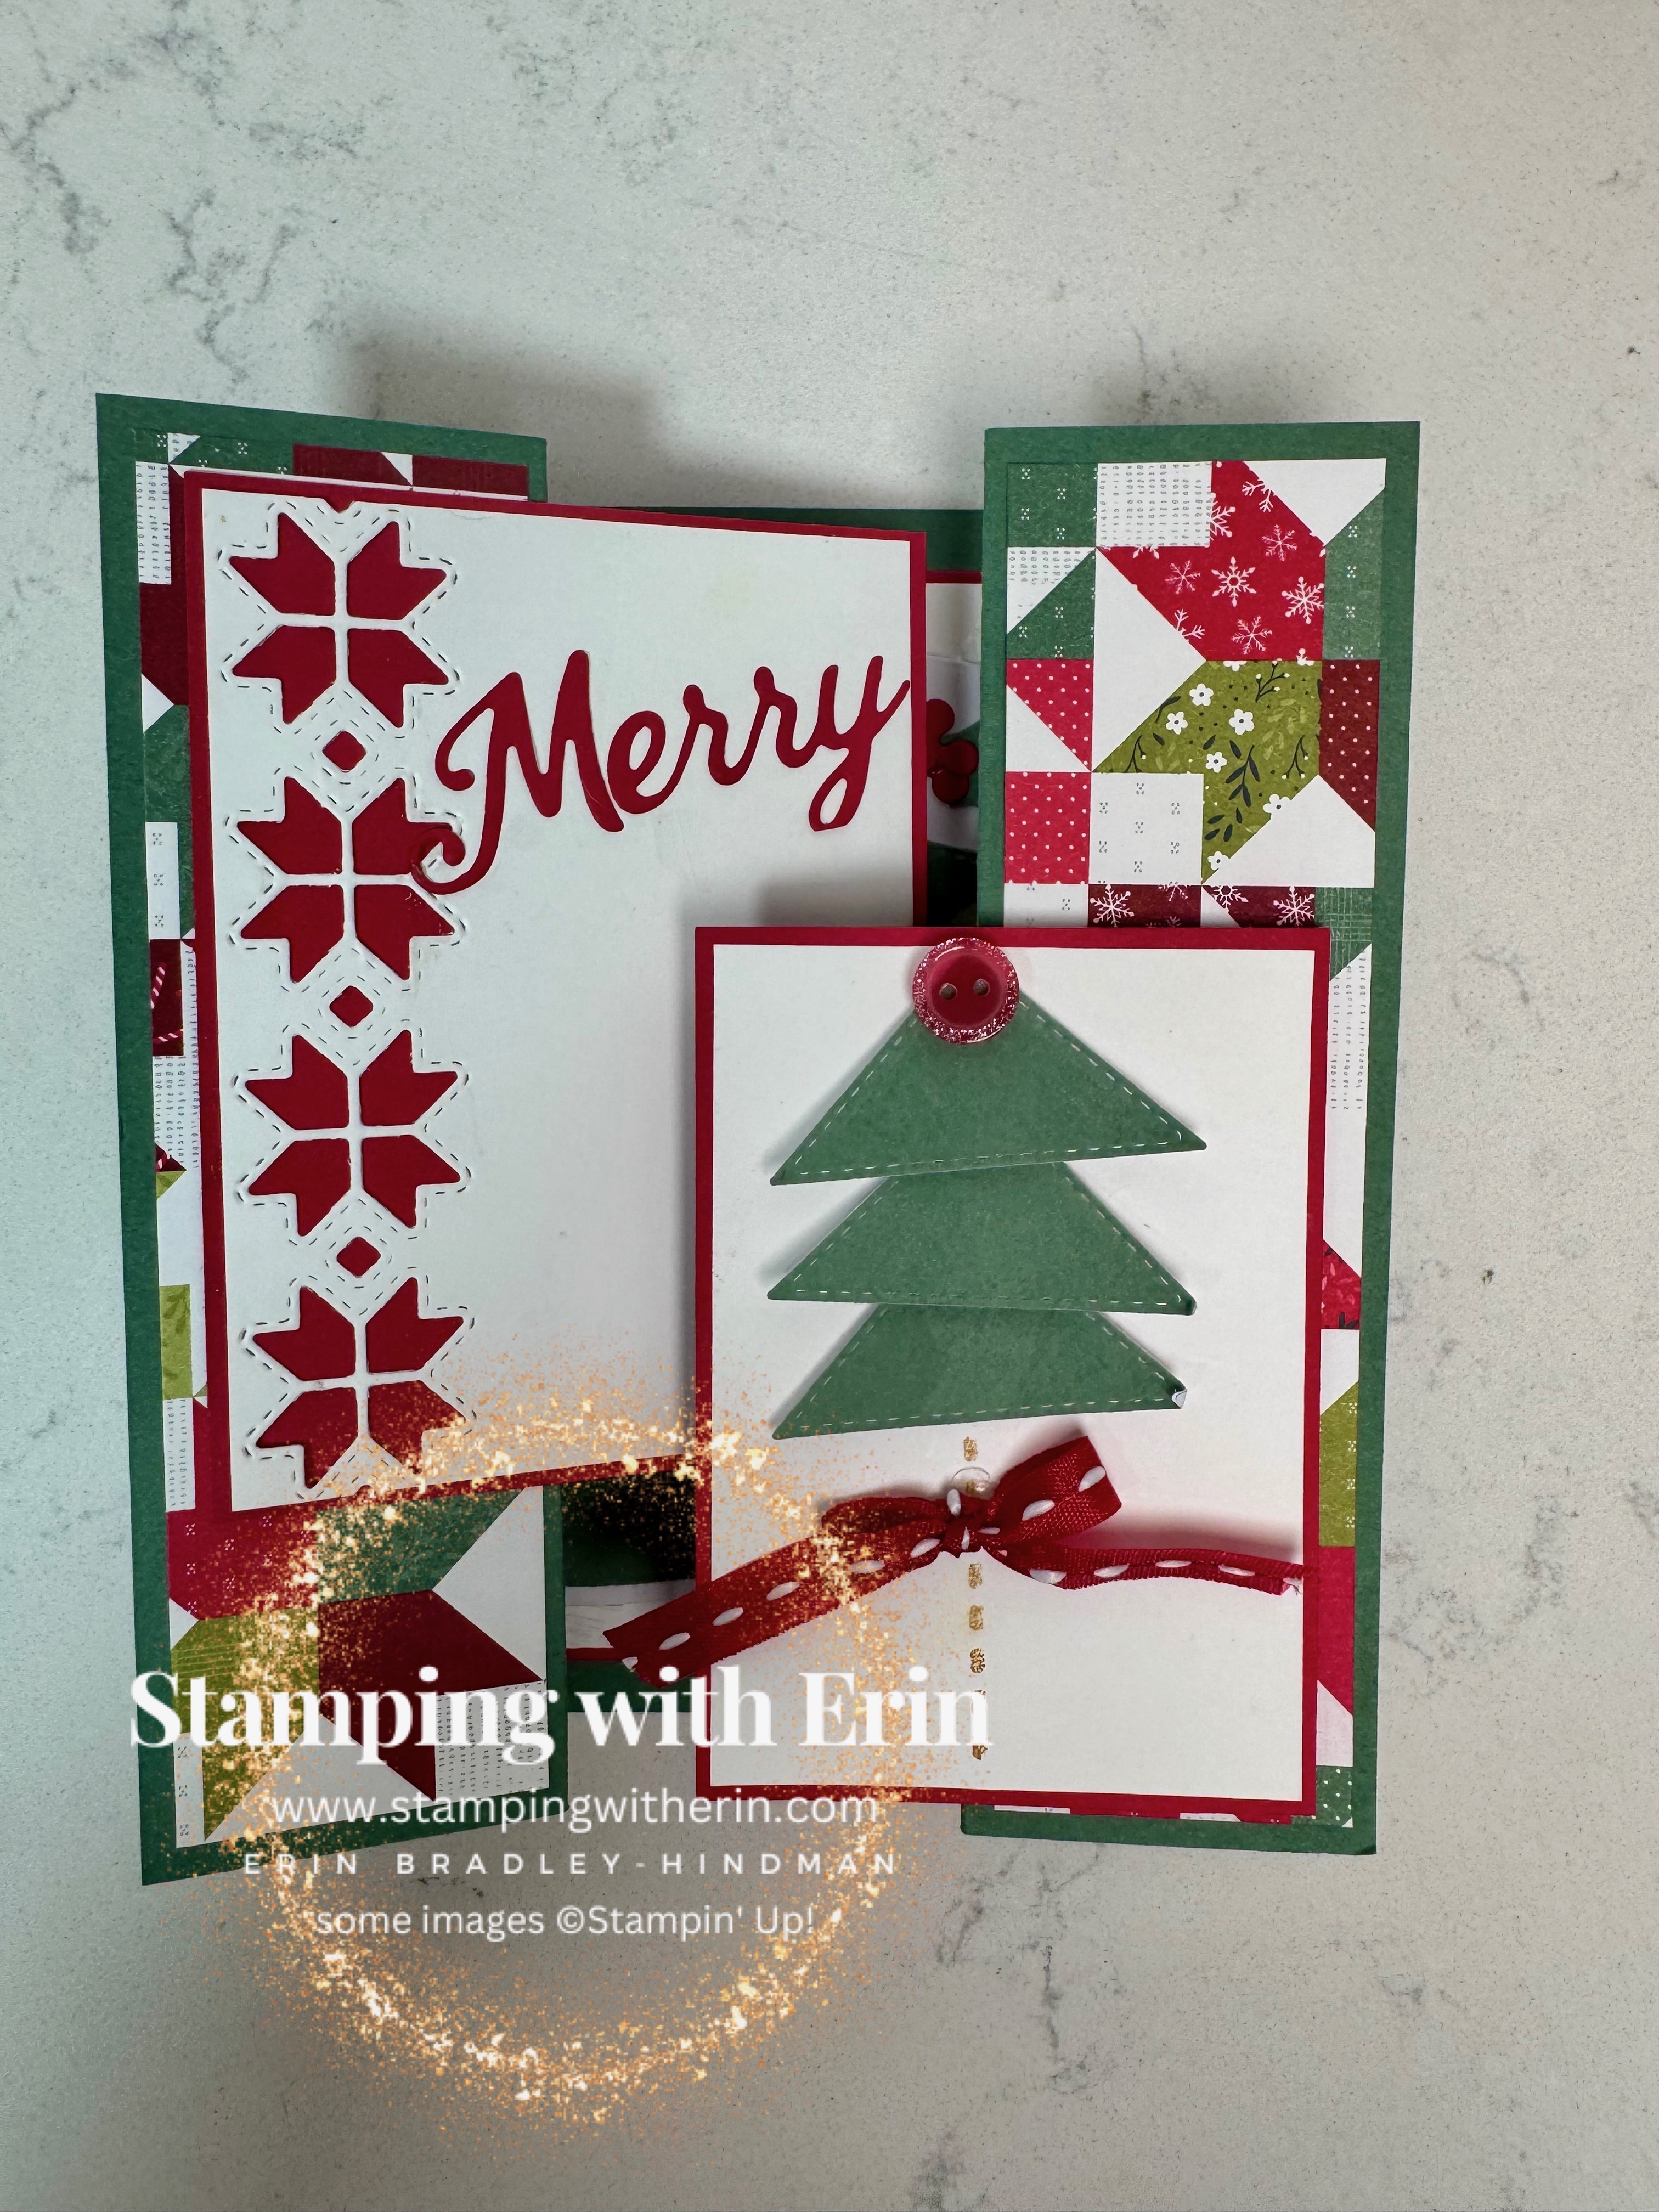

This card is so nostalgic! I loved the Stitched Season Suite the second I saw it!
Today everyone can buy it!
Here’s the video:
If you want the measurements for this card, click on instructions on the top of my site and look for “interlocking”.
Product List
Got a question? Ask away!

If you want to see the Reel making this card, just click on the picture above.
Since Father’s Day is over, (I made this one for my dad!), you could change the sentiment to Happy Birthday or many other things.
I have many cards using this technique and the instructions for it are under “instructions”.
Product List
![Botanical Glow Bundle [ 170057 ]](https://i0.wp.com/assets1.tamsnetwork.com/images/EC042017NF/170057s.jpg?w=120&ssl=1 "Botanical Glow Bundle [ 170057 ]")
![Butterfly Flight Bundle [ 170065 ]](https://i0.wp.com/assets1.tamsnetwork.com/images/EC042017NF/170065s.jpg?w=120&ssl=1 "Butterfly Flight Bundle [ 170065 ]")
![Flourish & Frames Bundle [ 170061 ]](https://i0.wp.com/assets1.tamsnetwork.com/images/EC042017NF/170061s.jpg?w=120&ssl=1 "Flourish & Frames Bundle [ 170061 ]")
![Gold Stampin' Hot Foil Rolls [ 170066 ]](https://i0.wp.com/assets1.tamsnetwork.com/images/EC042017NF/170066s.jpg?w=120&ssl=1 "Gold Stampin' Hot Foil Rolls [ 170066 ]")
![Peaceful Pine 8 1/2" X 11" Cardstock [ 167691 ]](https://i0.wp.com/assets1.tamsnetwork.com/images/EC042017NF/167691s.jpg?w=120&ssl=1 "Peaceful Pine 8 1/2\" X 11\" Cardstock [ 167691 ]")
![Basic White 8 1/2" X 11" Cardstock [ 166780 ]](https://i0.wp.com/assets1.tamsnetwork.com/images/EC042017NF/166780s.jpg?w=120&ssl=1 "Basic White 8 1/2\" X 11\" Cardstock [ 166780 ]")
![Peaceful Pine Classic Stampin Pad [ 167679 ]](https://i0.wp.com/assets1.tamsnetwork.com/images/EC042017NF/167679s.jpg?w=120&ssl=1 "Peaceful Pine Classic Stampin Pad [ 167679 ]")
![Berry Burst Classic Stampin' Pad [ 147143 ]](https://i0.wp.com/assets1.tamsnetwork.com/images/EC042017NF/147143s.jpg?w=120&ssl=1 "Berry Burst Classic Stampin' Pad [ 147143 ]")
![Fresh Freesia Classic Stampin' Pad [ 155611 ]](https://i0.wp.com/assets1.tamsnetwork.com/images/EC042017NF/155611s.jpg?w=120&ssl=1 "Fresh Freesia Classic Stampin' Pad [ 155611 ]")
![Multipurpose Liquid Glue [ 110755 ]](https://i0.wp.com/assets1.tamsnetwork.com/images/EC042017NF/110755s.jpg?w=120&ssl=1 "Multipurpose Liquid Glue [ 110755 ]")
![Stampin' Dimensionals [ 104430 ]](https://i0.wp.com/assets1.tamsnetwork.com/images/EC042017NF/104430s.jpg?w=120&ssl=1 "Stampin' Dimensionals [ 104430 ]")
![Stampin' Positioner [ 167768 ]](https://i0.wp.com/assets1.tamsnetwork.com/images/EC042017NF/167768s.jpg?w=120&ssl=1 "Stampin' Positioner [ 167768 ]")
![Stampin' Hot Foil System Na & Craft Class [ 170009 ]](https://i0.wp.com/assets1.tamsnetwork.com/images/EC042017NF/170009s.jpg?w=120&ssl=1 "Stampin' Hot Foil System Na & Craft Class [ 170009 ]")
![Blending Brushes [ 153611 ]](https://i0.wp.com/assets1.tamsnetwork.com/images/EC042017NF/153611s.jpg?w=120&ssl=1 "Blending Brushes [ 153611 ]")
![Balloon Festoon Bundle (English) [ 167606 ]](https://i0.wp.com/assets1.tamsnetwork.com/images/EC042017NF/167606s.jpg?w=120&ssl=1 "Balloon Festoon Bundle (English) [ 167606 ]")
![Balloon Festoon Photopolymer Stamp Set (English) [ 167602 ]](https://i0.wp.com/assets1.tamsnetwork.com/images/EC042017NF/167602s.jpg?w=120&ssl=1 "Balloon Festoon Photopolymer Stamp Set (English) [ 167602 ]")
![Balloon Festoon Dies [ 167605 ]](https://i0.wp.com/assets1.tamsnetwork.com/images/EC042017NF/167605s.jpg?w=120&ssl=1 "Balloon Festoon Dies [ 167605 ]")
![Beautiful Ordinary Life 12" X 12" (30.5 X 30.5 Cm) Designer Series Paper [ 167553 ]](https://i0.wp.com/assets1.tamsnetwork.com/images/EC042017NF/167553s.jpg?w=120&ssl=1 "Beautiful Ordinary Life 12\" X 12\" (30.5 X 30.5 Cm) Designer Series Paper [ 167553 ]")
![Pool Party 8-1/2" X 11" Cardstock [ 122924 ]](https://i0.wp.com/assets1.tamsnetwork.com/images/EC042017NF/122924s.jpg?w=120&ssl=1 "Pool Party 8-1/2\" X 11\" Cardstock [ 122924 ]")
![Flirty Flamingo Classic Stampin' Pad [ 147052 ]](https://i0.wp.com/assets1.tamsnetwork.com/images/EC042017NF/147052s.jpg?w=120&ssl=1 "Flirty Flamingo Classic Stampin' Pad [ 147052 ]")
![Daffodil Delight Classic Stampin' Pad [ 147094 ]](https://i0.wp.com/assets1.tamsnetwork.com/images/EC042017NF/147094s.jpg?w=120&ssl=1 "Daffodil Delight Classic Stampin' Pad [ 147094 ]")
![Flirty Flamingo Stampin' Blends Combo Pack [ 154884 ]](https://i0.wp.com/assets1.tamsnetwork.com/images/EC042017NF/154884s.jpg?w=120&ssl=1 "Flirty Flamingo Stampin' Blends Combo Pack [ 154884 ]")
![Baker's Twine Essentials Pack [ 155475 ]](https://i0.wp.com/assets1.tamsnetwork.com/images/EC042017NF/155475s.jpg?w=120&ssl=1 "Baker's Twine Essentials Pack [ 155475 ]")
![Array Of Dots [ 167559 ]](https://i0.wp.com/assets1.tamsnetwork.com/images/EC042017NF/167559s.jpg?w=120&ssl=1 "Array Of Dots [ 167559 ]")
![Mini Glue Dots [ 103683 ]](https://i0.wp.com/assets1.tamsnetwork.com/images/EC042017NF/103683s.jpg?w=120&ssl=1 "Mini Glue Dots [ 103683 ]")
![Paper Trimmer [ 152392 ]](https://i0.wp.com/assets1.tamsnetwork.com/images/EC042017NF/152392s.jpg?w=120&ssl=1 "Paper Trimmer [ 152392 ]")
![Simply Scored [ 122334 ]](https://i0.wp.com/assets1.tamsnetwork.com/images/EC042017NF/122334s.jpg?w=120&ssl=1 "Simply Scored [ 122334 ]")
![Stampin' Cut & Emboss Machine [ 149653 ]](https://i0.wp.com/assets1.tamsnetwork.com/images/EC042017NF/149653s.jpg?w=120&ssl=1 "Stampin' Cut & Emboss Machine [ 149653 ]")

![Frightfully Fun Suite Collection (English) [ 168183 ]](https://i0.wp.com/assets1.tamsnetwork.com/images/EC042017NF/168183s.jpg?w=120&ssl=1 "Frightfully Fun Suite Collection (English) [ 168183 ]")
![Oh My Fright Bundle (English) [ 168176 ]](https://i0.wp.com/assets1.tamsnetwork.com/images/EC042017NF/168176s.jpg?w=120&ssl=1 "Oh My Fright Bundle (English) [ 168176 ]")
![Oh My Fright Photopolymer Stamp Set (English) [ 168169 ]](https://i0.wp.com/assets1.tamsnetwork.com/images/EC042017NF/168169s.jpg?w=120&ssl=1 "Oh My Fright Photopolymer Stamp Set (English) [ 168169 ]")
![Oh My Fright Dies [ 168175 ]](https://i0.wp.com/assets1.tamsnetwork.com/images/EC042017NF/168175s.jpg?w=120&ssl=1 "Oh My Fright Dies [ 168175 ]")
![Nested Essentials Dies [ 161597 ]](https://i0.wp.com/assets1.tamsnetwork.com/images/EC042017NF/161597s.jpg?w=120&ssl=1 "Nested Essentials Dies [ 161597 ]")
![Swirls Of Magic Embossing Folder [ 168179 ]](https://i0.wp.com/assets1.tamsnetwork.com/images/EC042017NF/168179s.jpg?w=120&ssl=1 "Swirls Of Magic Embossing Folder [ 168179 ]")
![Golden Glow 8 1/2" X 11" Cardstock [ 167685 ]](https://i0.wp.com/assets1.tamsnetwork.com/images/EC042017NF/167685s.jpg?w=120&ssl=1 "Golden Glow 8 1/2\" X 11\" Cardstock [ 167685 ]")
![Smoky Slate 8-1/2" X 11" Cardstock [ 131202 ]](https://i0.wp.com/assets1.tamsnetwork.com/images/EC042017NF/131202s.jpg?w=120&ssl=1 "Smoky Slate 8-1/2\" X 11\" Cardstock [ 131202 ]")
![Basic Black 8-1/2" X 11" Cardstock [ 121045 ]](https://i0.wp.com/assets1.tamsnetwork.com/images/EC042017NF/121045s.jpg?w=120&ssl=1 "Basic Black 8-1/2\" X 11\" Cardstock [ 121045 ]")
![2026–2028 In Color™ 12" X 12" (30.5 X 30.5 Cm) Pearlized Specialty Paper [ 167766 ]](https://i0.wp.com/assets1.tamsnetwork.com/images/EC042017NF/167766s.jpg?w=120&ssl=1 "2026–2028 In Color™ 12\" X 12\" (30.5 X 30.5 Cm) Pearlized Specialty Paper [ 167766 ]")
![Golden Glow Shimmer Brush [ 167662 ]](https://i0.wp.com/assets1.tamsnetwork.com/images/EC042017NF/167662s.jpg?w=120&ssl=1 "Golden Glow Shimmer Brush [ 167662 ]")
![Black .04 Stampin' Journaling Pens [ 166647 ]](https://i0.wp.com/assets1.tamsnetwork.com/images/EC042017NF/166647s.jpg?w=120&ssl=1 "Black .04 Stampin' Journaling Pens [ 166647 ]")
![Smoky Slate Classic Stampin' Pad [ 147113 ]](https://i0.wp.com/assets1.tamsnetwork.com/images/EC042017NF/147113s.jpg?w=120&ssl=1 "Smoky Slate Classic Stampin' Pad [ 147113 ]")
![Basic Black Stampin' Blends Combo Pack [ 154843 ]](https://i0.wp.com/assets1.tamsnetwork.com/images/EC042017NF/154843s.jpg?w=120&ssl=1 "Basic Black Stampin' Blends Combo Pack [ 154843 ]")
![A Stitched Season Suite Collection (English) [ 168236 ]](https://i0.wp.com/assets1.tamsnetwork.com/images/EC042017NF/168236s.jpg?w=120&ssl=1 "A Stitched Season Suite Collection (English) [ 168236 ]")
![Stitched Stocking Bundle (English) [ 168231 ]](https://i0.wp.com/assets1.tamsnetwork.com/images/EC042017NF/168231s.jpg?w=120&ssl=1 "Stitched Stocking Bundle (English) [ 168231 ]")
![Words For The Season Dies (English) [ 165797 ]](https://i0.wp.com/assets1.tamsnetwork.com/images/EC042017NF/165797s.jpg?w=120&ssl=1 "Words For The Season Dies (English) [ 165797 ]")
![A Stitched Season 12" X 12" (30.5 X 30.5 Cm) Designer Series Paper [ 168223 ]](https://i0.wp.com/assets1.tamsnetwork.com/images/EC042017NF/168223s.jpg?w=120&ssl=1 "A Stitched Season 12\" X 12\" (30.5 X 30.5 Cm) Designer Series Paper [ 168223 ]")
![Velveteen Assortment 12" X 12" (30.5 X 30.5 Cm) Specialty Paper [ 167915 ]](https://i0.wp.com/assets1.tamsnetwork.com/images/EC042017NF/167915s.jpg?w=120&ssl=1 "Velveteen Assortment 12\" X 12\" (30.5 X 30.5 Cm) Specialty Paper [ 167915 ]")
![Real Red 8-1/2" X 11" Cardstock [ 102482 ]](https://i0.wp.com/assets1.tamsnetwork.com/images/EC042017NF/102482s.jpg?w=120&ssl=1 "Real Red 8-1/2\" X 11\" Cardstock [ 102482 ]")
![Adhesive Backed Mini Christmas Buttons [ 168234 ]](https://i0.wp.com/assets1.tamsnetwork.com/images/EC042017NF/168234s.jpg?w=120&ssl=1 "Adhesive Backed Mini Christmas Buttons [ 168234 ]")
![Real Red 1/4" (6.4 Mm) Stitched Ribbon [ 168235 ]](https://i0.wp.com/assets1.tamsnetwork.com/images/EC042017NF/168235s.jpg?w=120&ssl=1 "Real Red 1/4\" (6.4 Mm) Stitched Ribbon [ 168235 ]")
![Foam Adhesive Strips [ 141825 ]](https://i0.wp.com/assets1.tamsnetwork.com/images/EC042017NF/141825s.jpg?w=120&ssl=1 "Foam Adhesive Strips [ 141825 ]")
![Waterside Retreat Suite Collection (English) [ 167932 ]](https://i0.wp.com/assets1.tamsnetwork.com/images/EC042017NF/167932s.jpg?w=120&ssl=1 "Waterside Retreat Suite Collection (English) [ 167932 ]")
![Relaxing Waterside Bundle (English) [ 167928 ]](https://i0.wp.com/assets1.tamsnetwork.com/images/EC042017NF/167928s.jpg?w=120&ssl=1 "Relaxing Waterside Bundle (English) [ 167928 ]")
![Relaxing Waterside Photopolymer Stamp Set (English) [ 167922 ]](https://i0.wp.com/assets1.tamsnetwork.com/images/EC042017NF/167922s.jpg?w=120&ssl=1 "Relaxing Waterside Photopolymer Stamp Set (English) [ 167922 ]")
![Relaxing Waterside Dies [ 167927 ]](https://i0.wp.com/assets1.tamsnetwork.com/images/EC042017NF/167927s.jpg?w=120&ssl=1 "Relaxing Waterside Dies [ 167927 ]")
![Stylish Shapes Dies [ 159183 ]](https://i0.wp.com/assets1.tamsnetwork.com/images/EC042017NF/159183s.jpg?w=120&ssl=1 "Stylish Shapes Dies [ 159183 ]")
![Pecan Pie Classic Stampin' Pad [ 161665 ]](https://i0.wp.com/assets1.tamsnetwork.com/images/EC042017NF/161665s.jpg?w=120&ssl=1 "Pecan Pie Classic Stampin' Pad [ 161665 ]")
![Pool Party Classic Stampin' Pad [ 147107 ]](https://i0.wp.com/assets1.tamsnetwork.com/images/EC042017NF/147107s.jpg?w=120&ssl=1 "Pool Party Classic Stampin' Pad [ 147107 ]")
![Misty Moonlight 8-1/2" X 11" Cardstock [ 153081 ]](https://i0.wp.com/assets1.tamsnetwork.com/images/EC042017NF/153081s.jpg?w=120&ssl=1 "Misty Moonlight 8-1/2\" X 11\" Cardstock [ 153081 ]")
![Old Olive Stampin' Blends Combo Pack [ 154892 ]](https://i0.wp.com/assets1.tamsnetwork.com/images/EC042017NF/154892s.jpg?w=120&ssl=1 "Old Olive Stampin' Blends Combo Pack [ 154892 ]")
![Pecan Pie Stampin’ Blends Combo Pack [ 161674 ]](https://i0.wp.com/assets1.tamsnetwork.com/images/EC042017NF/161674s.jpg?w=120&ssl=1 "Pecan Pie Stampin’ Blends Combo Pack [ 161674 ]")
![Linen Thread [ 104199 ]](https://i0.wp.com/assets1.tamsnetwork.com/images/EC042017NF/104199s.jpg?w=120&ssl=1 "Linen Thread [ 104199 ]")
![Loose Anchor Trinkets [ 167931 ]](https://i0.wp.com/assets1.tamsnetwork.com/images/EC042017NF/167931s.jpg?w=120&ssl=1 "Loose Anchor Trinkets [ 167931 ]")