

Here’s the card we made earlier today! Here’s the video on YouTube. You’ll learn some about Milton the Hurricane!
Product List

Here’s the card we made earlier today! Here’s the video on YouTube. You’ll learn some about Milton the Hurricane!
Product List
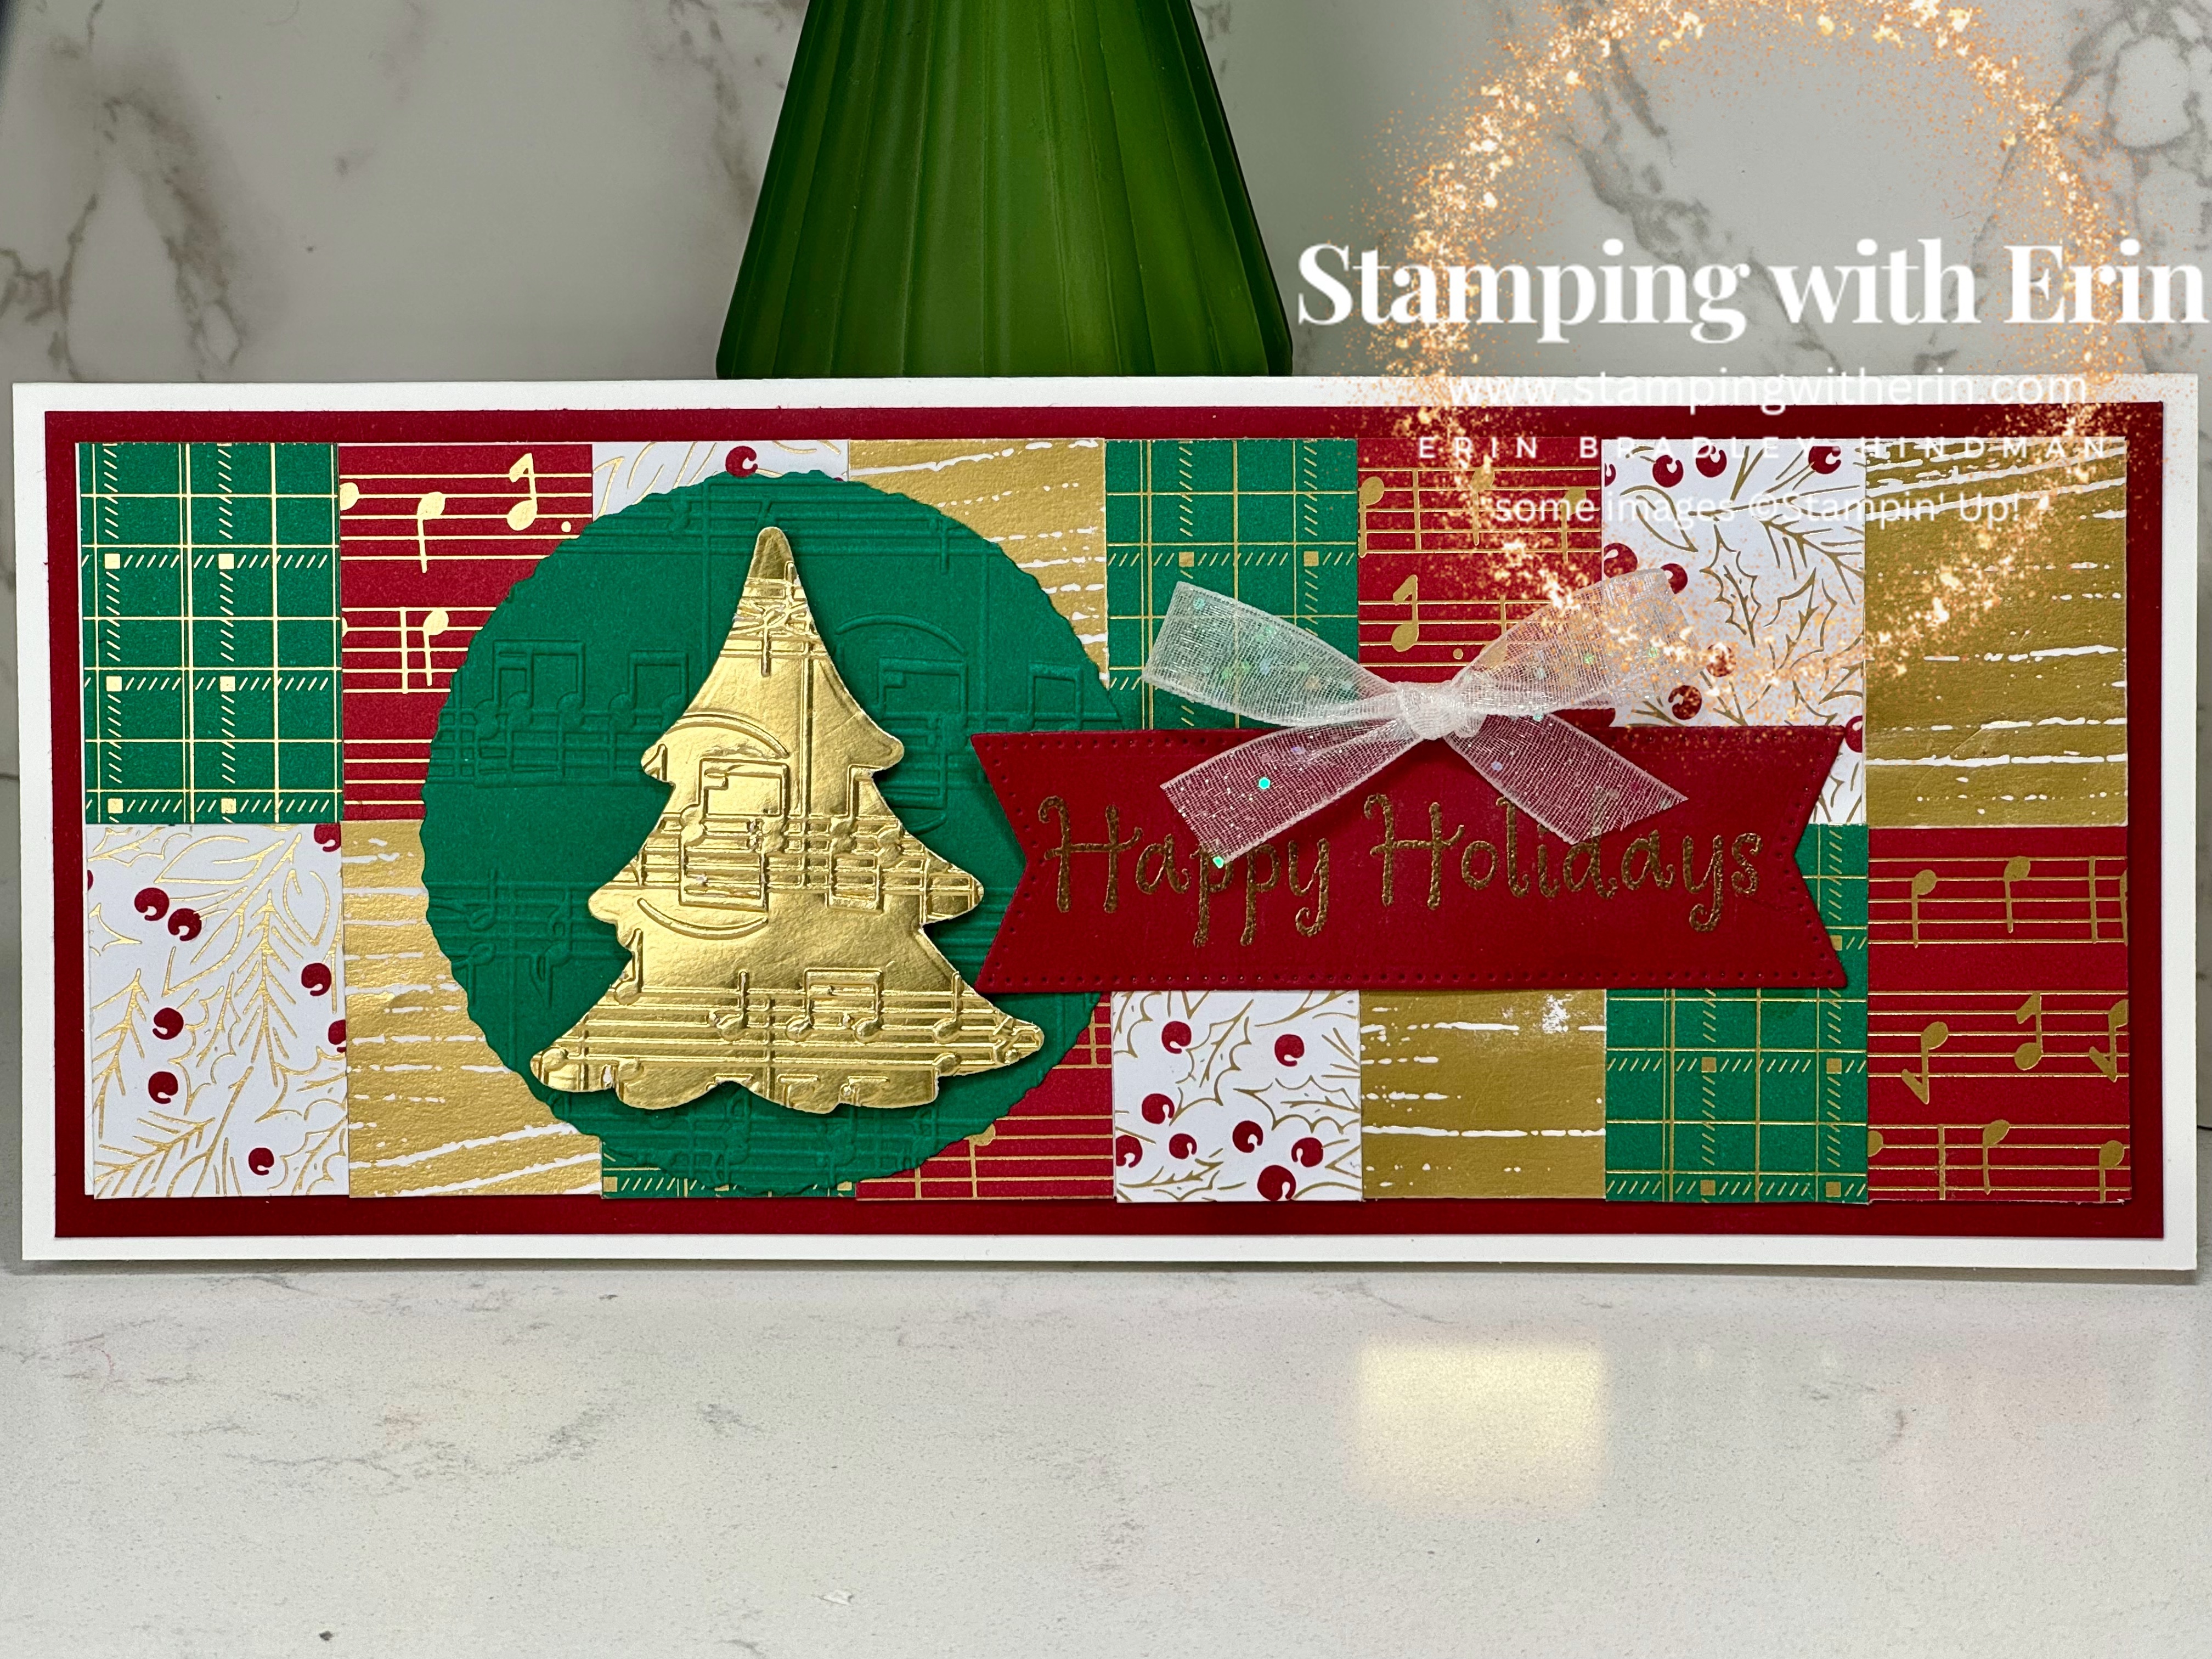
This card is a little different than most cards I make. I was looking at all the pretty paper from the mini that is retiring. The Joyful Specialty DSP is so dang pretty and I hadn’t used much of it. So, I decided I would use some of each sheet! (I checked today and it’s still available.)
For the tree, I die cut the smaller tree with the Gold Foil. I embossed with the Merry Melody Embossing Folder.
I die cut a Deckled Circle die with Shaded Spruce and embossed it with Merry Melody.
The sentiment is from the Throughout the Year stamp set. I stamped with Versamark on Cherry Cobbler, heat embossed with gold powder and then die cut with the Stylish Shapes.
I glued the pieces of the Joyful DSP on top of a Basic White. (See the measurements below.)
I stamped on the inside of the card with “to you and yours” from the Merriest Trees stamp set with Cherry Cobbler.
I tied a little bow and put it above the sentiment.
Measurements:
Basic White: 8-1/2″ x 7″ Scored at 3-1/2″
Cherry Cobbler: 8-1/4″ x 3-1/4″
Basic White: 8″ x 3″ (You won’t see this one- you glue the Joyful DSP on top)
Joyful DSP: 1-1/2″ x 1″ You’ll need 4 of each sheet- 16 total
Scraps of Shaded Spruce
Scraps of Cherry Cobbler
Product List
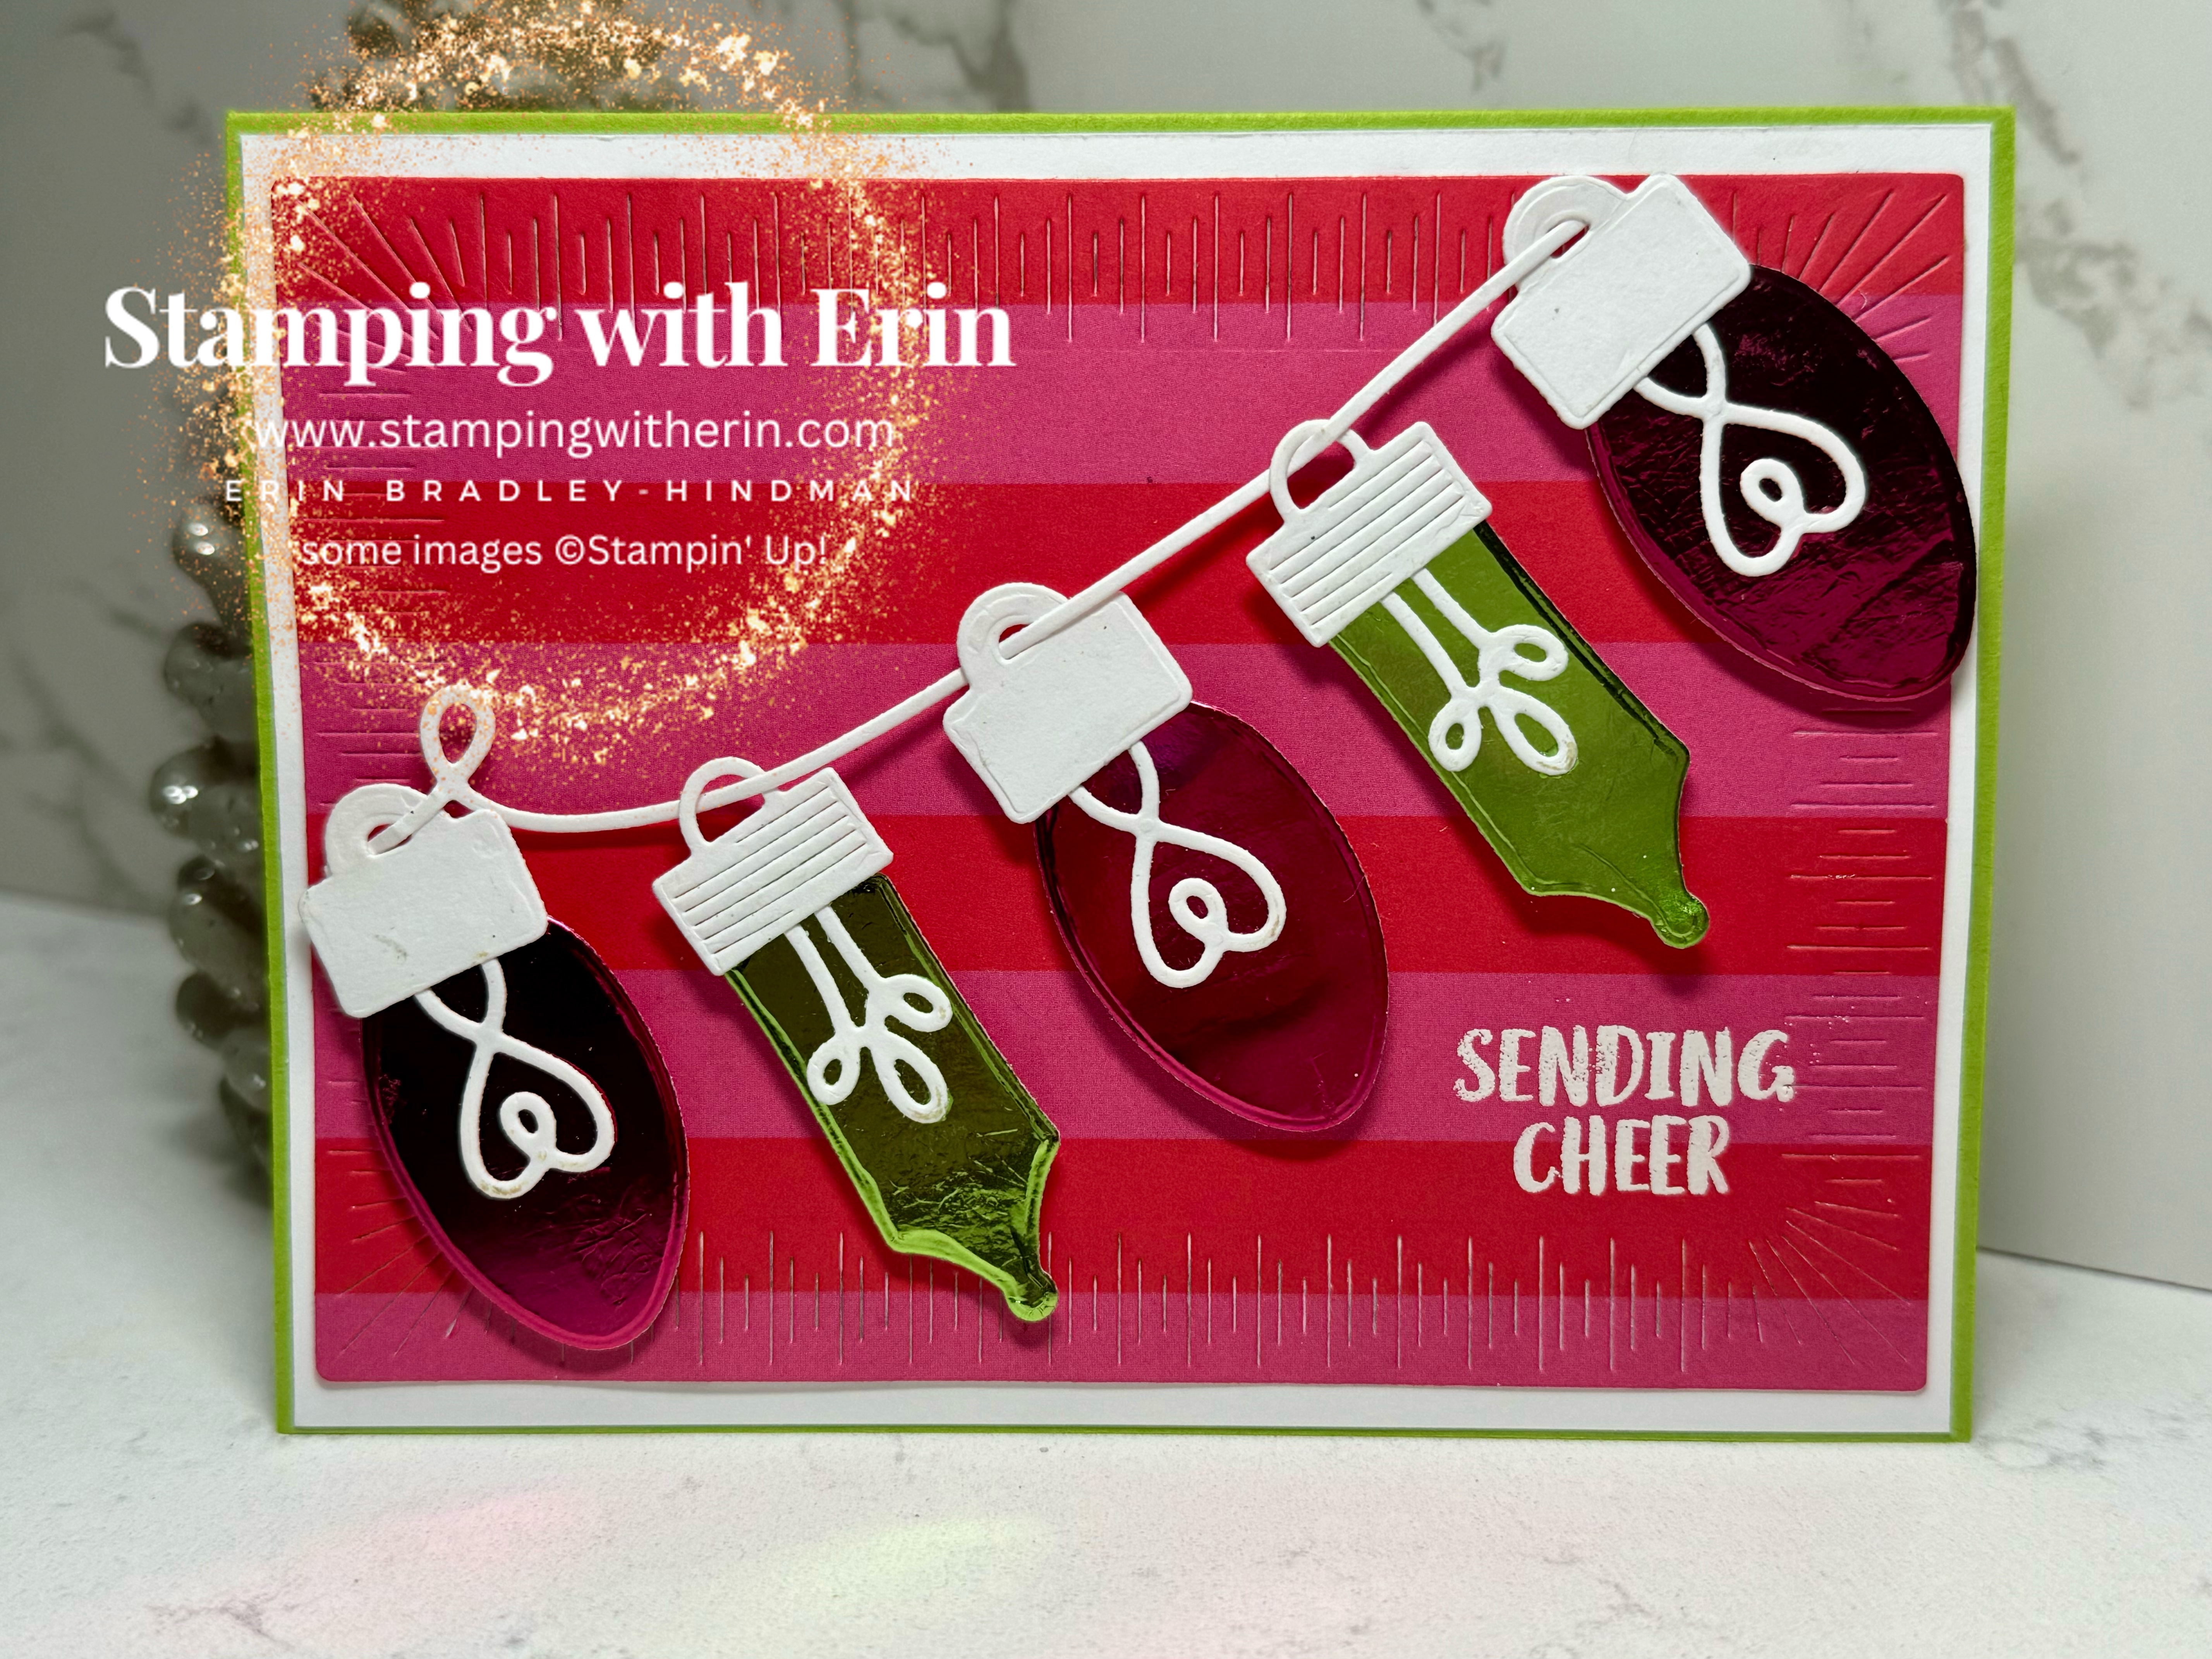
Lining up those lights exactly how you want them can be a little tricky. Just have to have patience! At least for me.
I die cut the bigger lights with the Melon Mambo foil and the smaller ones with the Granny Apple Green foil. The tops and the middle parts of the lights and the string is Basic White. I used Dimensionals on them.
The background paper is from the Merry Bold & Bright DSP. I used the Radiating Stitches dies on it to give it some texture.
The sentiment is from the Sending Cheer stamp set. I stamped with Versamark and heat embossed with white embossing powder. Done!
Measurements:
Granny Apple Green 5-1/2″ x 8-1/2″ Scored at 4-1/4″
Basic White 5-3/8″ x 4-1/8″
Merry Bold & Bright DSP 3-7/8″ x 5-1/4″
Scraps of Basic White
Scraps of Melon Mambo & Granny Apple Green Foil
Product List

I wanted to make a tree that looked like the trees from The Grinch. Except I wanted it to be straight, not bending at the top. The Merriest Trees dies are great for making all different sizes of trees!
I die cut the largest tree twice. The next largest size twice. The next size three times. I just arranged them until I got them to look like I wanted. All with Granny Apple Green cardstock. I used my Blending Brush with Granny Apple Green ink to add a little color on the edges.
I glued the trees together (just put glue on the bottom of each tree when arranging. Once dry, put glue all over the back to glue to the card base).
I added tons of Basic Rhinestones. I colored them with the Poppy Parade, Melon Mambo and Granny Apple Green Blends. I used the light and dark of all three.
The sentiment is from the Merriest Trees stamp set, I stamped with Shaded Spruce on Basic White. I fussy cut into a rectangle. Added on top of the tree with Dimensionals.
The tree base is with Silver Foil.
The background paper is from the Merry Bold & Bright DSP.
Measurements:
Granny Apple Green 8-1/2″ x 7″ Scored at 3-1/2″
Merry Bold & Bright DSP 8-3/8″ x 3-3/8″
Lots of Granny Apple Green for the tree
Scraps of Silver Foil for the Base
Scraps of Basic White for the sentiment
Product List

It was fun to make a birthday card in December! Of course, many people have December birthdays. I know a few.
I started with the Sketched Plaid stamp. I wanted to use it and decided to stamp it twice. First was with Lemon Lolly, the second time I moved the cardstock 90° and stamped with Versamark. I used the Stamparatus, which is no longer available. You could use another stamp positioning tool.
I heat embossed with silver embossing powder. I didn’t use my Embossing Buddy, so you can see some flecks/dots but I kinda liked the way that looked.
The flower was stamped with Poppy Parade and then die cut.
The leaves were stamped with Lemon Lime Twist and then die cut.
Happy Birthday was stamped with Poppy Parade and then die cut with the Stylish Shapes dies.
I added some Lemon Lolly Solid Gems. Done!
Measurements:
Lemon Lolly 4-1/4″ x 11″ Scored at 5-1/2″
Basic White 4-1/8″ x 5-3/8″
Scraps of Basic White.
Product List

This card uses dies from 3 different sets! They are all retiring. 🙁 It was a pretty easy card.
The lights are from the Merry & Bright Dies. I die cut them with the Melon Mambo & Granny Apple Green Foil sheets.
The “NOEL” is from the Joy of Noel Dies. I used Silver Foil for that (I don’t think that’s available anymore, but any silver foil would work).
The label behind “NOEL” is from the Christmas Classics Dies. I die cut once with Basic White and once with the Vellum Basics. I added some Iridescent Adhesive Backed Discs (not retiring!) where the berries would be.
The background is embossed with the Snowflake Sky Embossing Folder (also not retiring!).
Measurements:
Melon Mambo 4-1/4″ x 11″ Scored at 5-1/2″
Basic White 4-1/8″ x 5-3/8″
Scraps of Basic White, Melon Mambo & Granny Apple Green Foil, Silver Foil and Vellum Basics
Product List
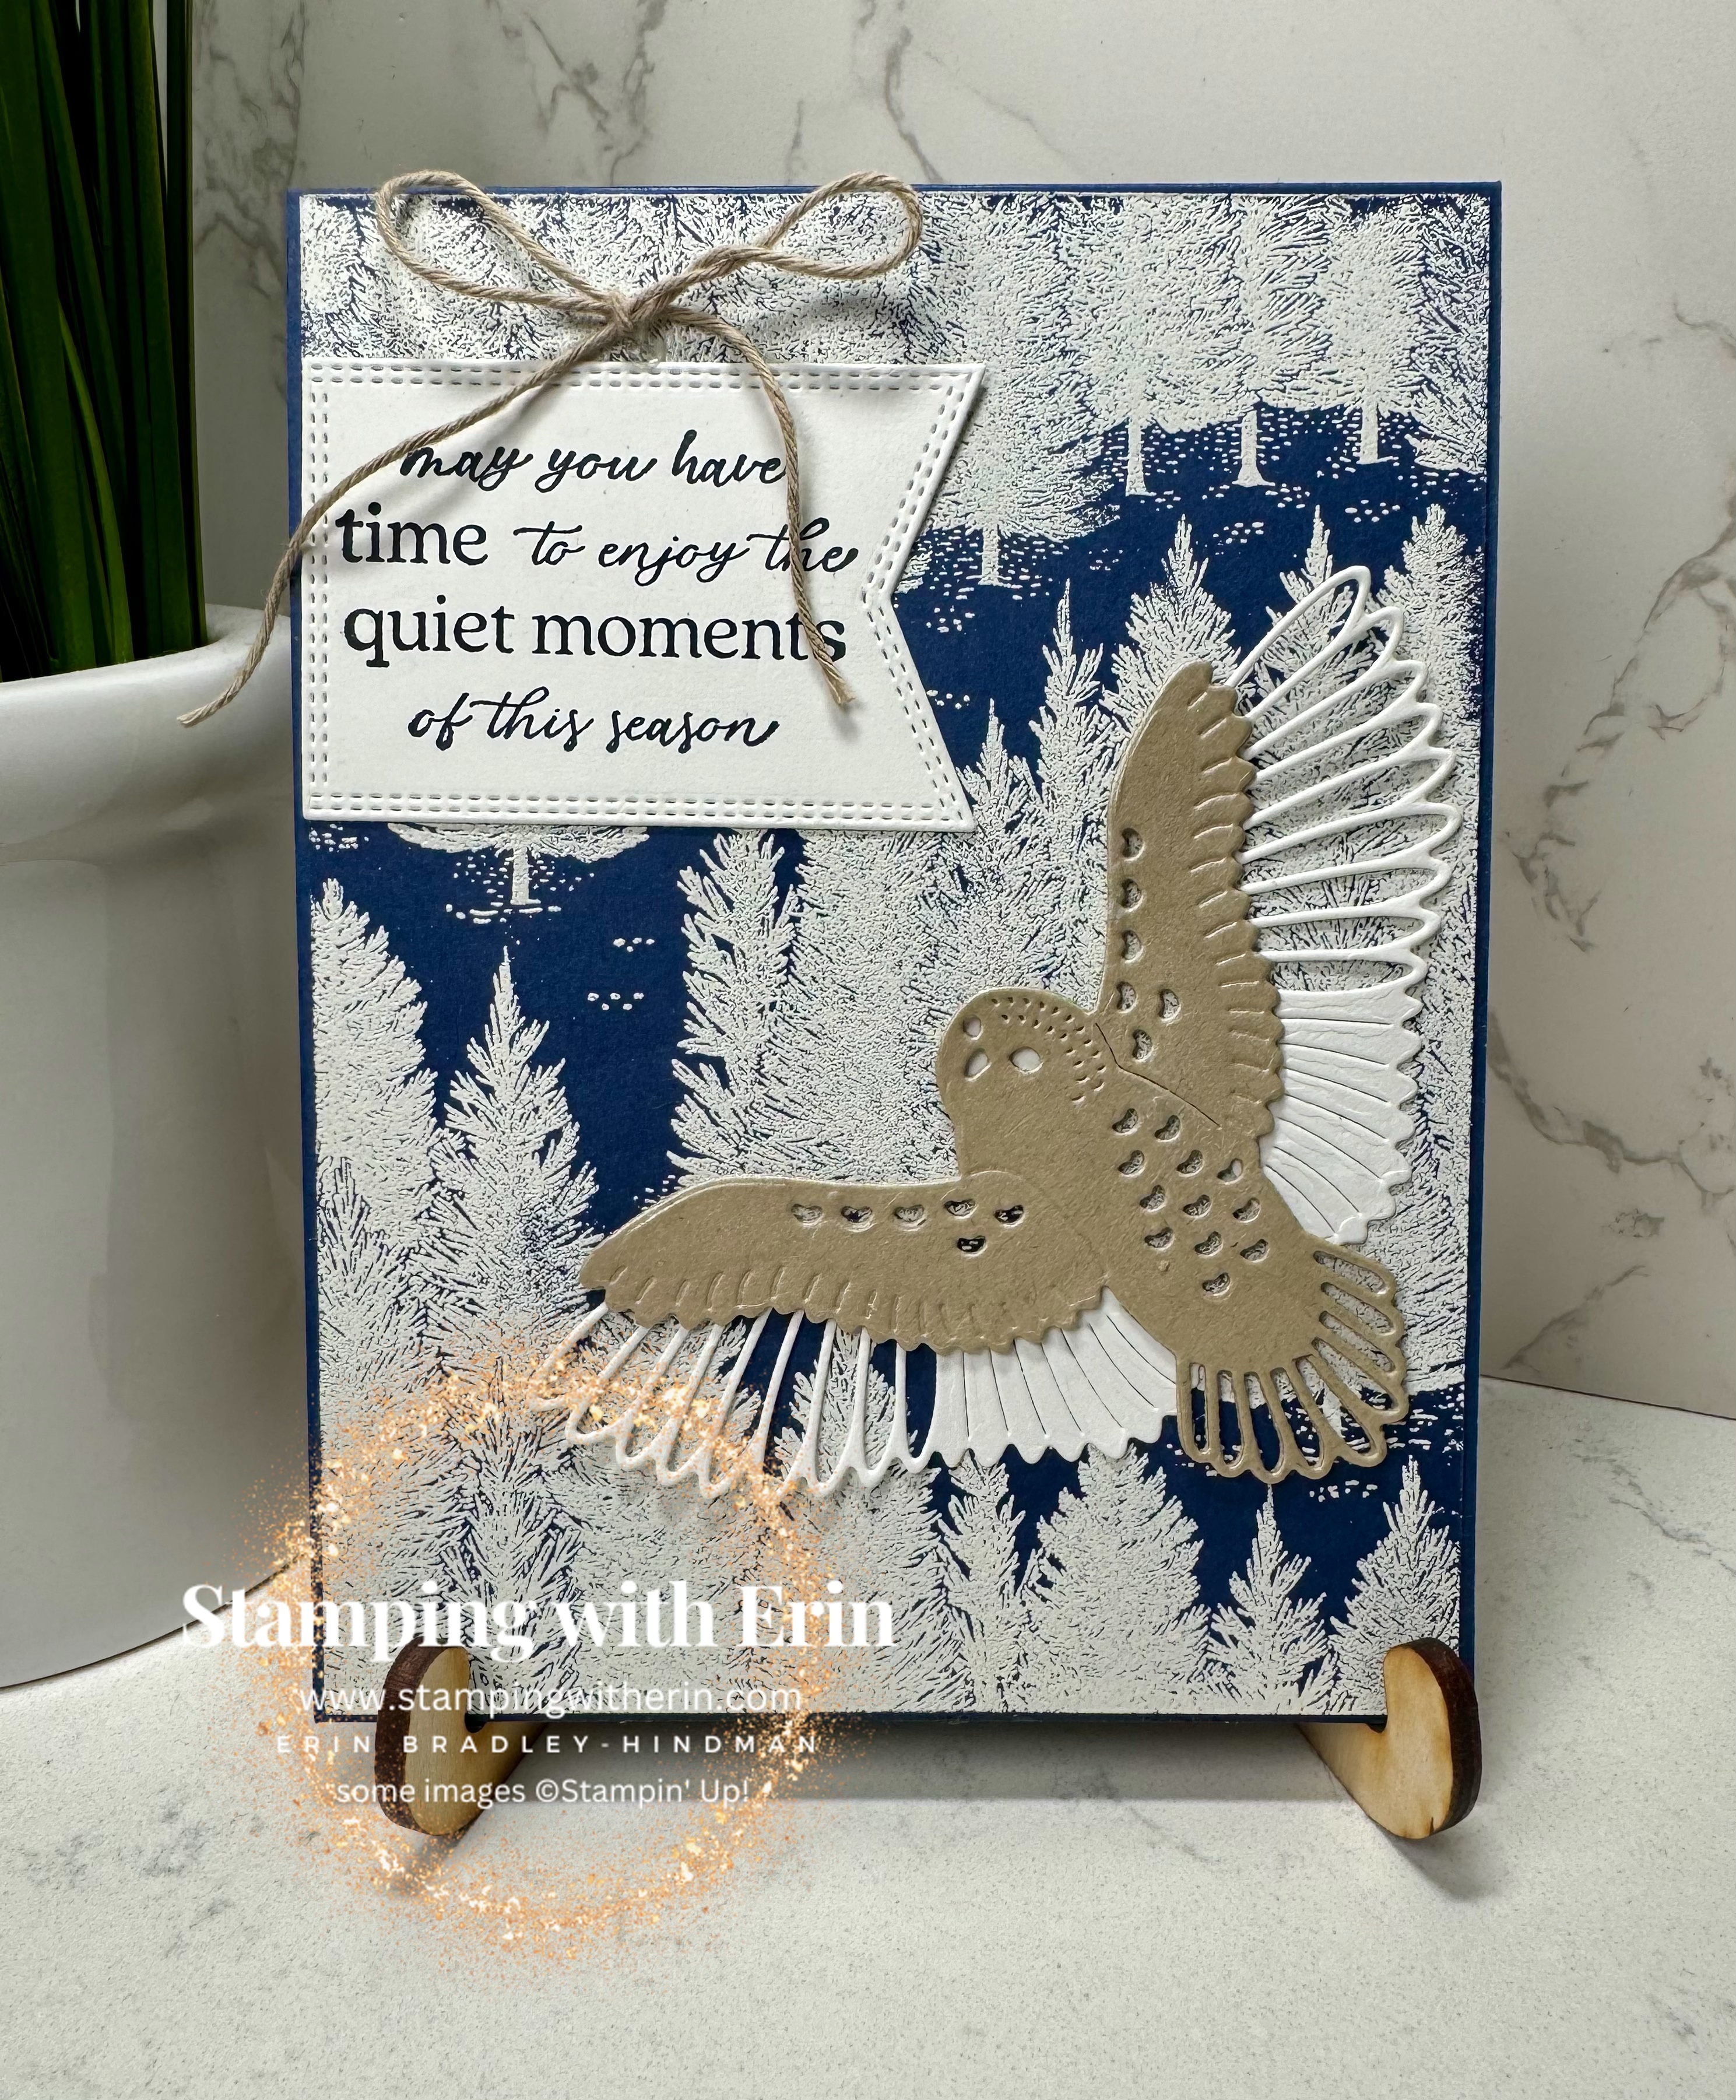
I was sad to see the Winter Owls are retiring. I only used it once- this card!
I die cut the owl with Crumb Cake and his wings with Basic White. With a sponge I colored the Crumb Cake part with the White Pearlized Enamel Effects. Made him shiny!
For the background, I stamped the Fragrant Forest stamp on Night of Navy with Versamark. I embossed with white embossing powder.
I stamped the sentiment on Basic White with Night of Navy ink and die cut with the Nested Essentials dies.
I added a bow with the Baker’s Twine on top of the sentiment- done!
Measurements:
Night of Navy 4-1/4″ x 11″ scored at 5-1/2″
Night of Navy 4-1/8″ x 5-3/8″
Scraps of Basic White and Crumb Cake
Product List

Another Christmas card with the Stargazing DSP! I love that stuff!
The Santa is from the Traditions of St. Nick DSP, which of right now, is still available.
I stamped the Forest Forever trees with Mossy Meadow ink on Mossy Meadow paper. Die cut.
I die cut a hill with the Basic Borders dies.
I stamped the sentiment (it has a “with” before Joy, Peace & Love, but I didn’t want that so I just inked up the words I wanted) with Mossy Meadow on Basic White. I just hand cut it into a rectangle.
I added Festive Pearls on the trees.
Here’s the measurements:
Basic White 4-1/4″ x 11″ scored at 5-1/2″
Mossy Meadow 4-1/8″ x 5-3/8″
Stargazing DSp 4″ x 5-1/4″
Mossy Meadow 4″ x 2″ (for the hill)
Scraps of Basic White
Product List

I absolutely love the Night Divine dies. This card was pretty easy- did a few “extra” things.
Here’s the measurements first:
Basic White 4-1/4″ x 11″ scored at 5-1/2″
Misty Moonlight 4-1/8″ x 5-3/8″
O Holy Night DSP 4″ x 5-1/4″
Gold Foil 2-1/2″ x 2-1/2″
O Holy Night DSP- the one with the hills. I fussy cut one and trimmed it to 4″ wide.
I die cut the manger with Crumb Cake. I placed it on the DSP, not gluing, and traced the top of it with a pencil. Taking the star die (with dots/holes all around it) from Stars at Night, I die cut from the DSP using the trace. I wanted it so the dots/holes would show all around the top of the manger.
I die cut the star again with Basic White. Set aside.
I glued the manger to the DSP. There will be an empty star behind it, but it will be fixed later.
I die cut the nativity scene with Basic White.
I stamped the sentiment with Misty Moonlight on Basic White. Die cut with Nested Essentials dies.
Using a sponge and the Gold Enamel Effects, I went over the sentiment, the nativity scene, and the Basic White star very lightly. Let dry.
I glued the star on the space where I die cut the star on the DSP. Since the manger is already glued, the star will be on top of it.
Take the piece of Gold Foil, I glue behind the DSP so that the holes would have the gold foil behind them.
Pretty easy card that has such a beautiful scene.
Product List
![Reindeer Fun Bundle (English) [ 164044 ]](https://i0.wp.com/assets1.tamsnetwork.com/images/EC042017NF/164044s.jpg?w=120&ssl=1 "Reindeer Fun Bundle (English) [ 164044 ]")
![Reindeer Fun Photopolymer Stamp Set (English) [ 164167 ]](https://i0.wp.com/assets1.tamsnetwork.com/images/EC042017NF/164167s.jpg?w=120&ssl=1 "Reindeer Fun Photopolymer Stamp Set (English) [ 164167 ]")
![Falling Snow Cling Stamp Set [ 164312 ]](https://i0.wp.com/assets1.tamsnetwork.com/images/EC042017NF/164312s.jpg?w=120&ssl=1 "Falling Snow Cling Stamp Set [ 164312 ]")
![Reindeer Fun Dies [ 164043 ]](https://i0.wp.com/assets1.tamsnetwork.com/images/EC042017NF/164043s.jpg?w=120&ssl=1 "Reindeer Fun Dies [ 164043 ]")
![Stylish Shapes Dies [ 159183 ]](https://i0.wp.com/assets1.tamsnetwork.com/images/EC042017NF/159183s.jpg?w=120&ssl=1 "Stylish Shapes Dies [ 159183 ]")
![Versamark Pad [ 102283 ]](https://i0.wp.com/assets1.tamsnetwork.com/images/EC042017NF/102283s.jpg?w=120&ssl=1 "Versamark Pad [ 102283 ]")
![Basics Wow! Embossing Powder [ 165679 ]](https://i0.wp.com/assets1.tamsnetwork.com/images/EC042017NF/165679s.jpg?w=120&ssl=1 "Basics Wow! Embossing Powder [ 165679 ]")
![Heat Tool (Us And Canada) [ 129053 ]](https://i0.wp.com/assets1.tamsnetwork.com/images/EC042017NF/129053s.jpg?w=120&ssl=1 "Heat Tool (Us And Canada) [ 129053 ]")
![Tuxedo Black Memento Ink Pad [ 132708 ]](https://i0.wp.com/assets1.tamsnetwork.com/images/EC042017NF/132708s.jpg?w=120&ssl=1 "Tuxedo Black Memento Ink Pad [ 132708 ]")
![Cherry Cobbler Classic Stampin' Pad [ 147083 ]](https://i0.wp.com/assets1.tamsnetwork.com/images/EC042017NF/147083s.jpg?w=120&ssl=1 "Cherry Cobbler Classic Stampin' Pad [ 147083 ]")
![Misty Moonlight Classic Stampin' Pad [ 153118 ]](https://i0.wp.com/assets1.tamsnetwork.com/images/EC042017NF/153118s.jpg?w=120&ssl=1 "Misty Moonlight Classic Stampin' Pad [ 153118 ]")
![Pecan Pie Stampin’ Blends Combo Pack [ 161674 ]](https://i0.wp.com/assets1.tamsnetwork.com/images/EC042017NF/161674s.jpg?w=120&ssl=1 "Pecan Pie Stampin’ Blends Combo Pack [ 161674 ]")
![Basic White 8 1/2" X 11" Cardstock [ 159276 ]](https://i0.wp.com/assets1.tamsnetwork.com/images/EC042017NF/159276s.jpg?w=120&ssl=1 "Basic White 8 1/2\" X 11\" Cardstock [ 159276 ]")
![Festive 12" X 12" (30.5 X 30.5 Cm) Glimmer Paper [ 164106 ]](https://i0.wp.com/assets1.tamsnetwork.com/images/EC042017NF/164106s.jpg?w=120&ssl=1 "Festive 12\" X 12\" (30.5 X 30.5 Cm) Glimmer Paper [ 164106 ]")
![A Little Bit Festive 12" X 12" (30.5 X 30.5 Cm) Mix & Match Specialty Designer Series Paper [ 164107 ]](https://i0.wp.com/assets1.tamsnetwork.com/images/EC042017NF/164107s.jpg?w=120&ssl=1 "A Little Bit Festive 12\" X 12\" (30.5 X 30.5 Cm) Mix & Match Specialty Designer Series Paper [ 164107 ]")
![Real Red & White Adhesive Backed Peppermints [ 164050 ]](https://i0.wp.com/assets1.tamsnetwork.com/images/EC042017NF/164050s.jpg?w=120&ssl=1 "Real Red & White Adhesive Backed Peppermints [ 164050 ]")
![Real Red & White Baker's Twine [ 164051 ]](https://i0.wp.com/assets1.tamsnetwork.com/images/EC042017NF/164051s.jpg?w=120&ssl=1 "Real Red & White Baker's Twine [ 164051 ]")
![Mini Glue Dots [ 103683 ]](https://i0.wp.com/assets1.tamsnetwork.com/images/EC042017NF/103683s.jpg?w=120&ssl=1 "Mini Glue Dots [ 103683 ]")
![Multipurpose Liquid Glue [ 110755 ]](https://i0.wp.com/assets1.tamsnetwork.com/images/EC042017NF/110755s.jpg?w=120&ssl=1 "Multipurpose Liquid Glue [ 110755 ]")
![Paper Trimmer [ 152392 ]](https://i0.wp.com/assets1.tamsnetwork.com/images/EC042017NF/152392s.jpg?w=120&ssl=1 "Paper Trimmer [ 152392 ]")
![Stampin' Cut & Emboss Machine [ 149653 ]](https://i0.wp.com/assets1.tamsnetwork.com/images/EC042017NF/149653s.jpg?w=120&ssl=1 "Stampin' Cut & Emboss Machine [ 149653 ]")
![Simply Scored [ 122334 ]](https://i0.wp.com/assets1.tamsnetwork.com/images/EC042017NF/122334s.jpg?w=120&ssl=1 "Simply Scored [ 122334 ]")
")
")


")

 Specialty Designer Series Paper")


 Iridescent Ribbon")


")
")


 Foil Sheets")
 Designer Series Paper")


 Specialty Pack")


")
")


 Specialty Designer Series Paper")


")
")


")


")
")


 Designer Series Paper")
 Designer Series Paper")


")
")

 Designer Series Paper")


