Background Made with Tissue Paper!

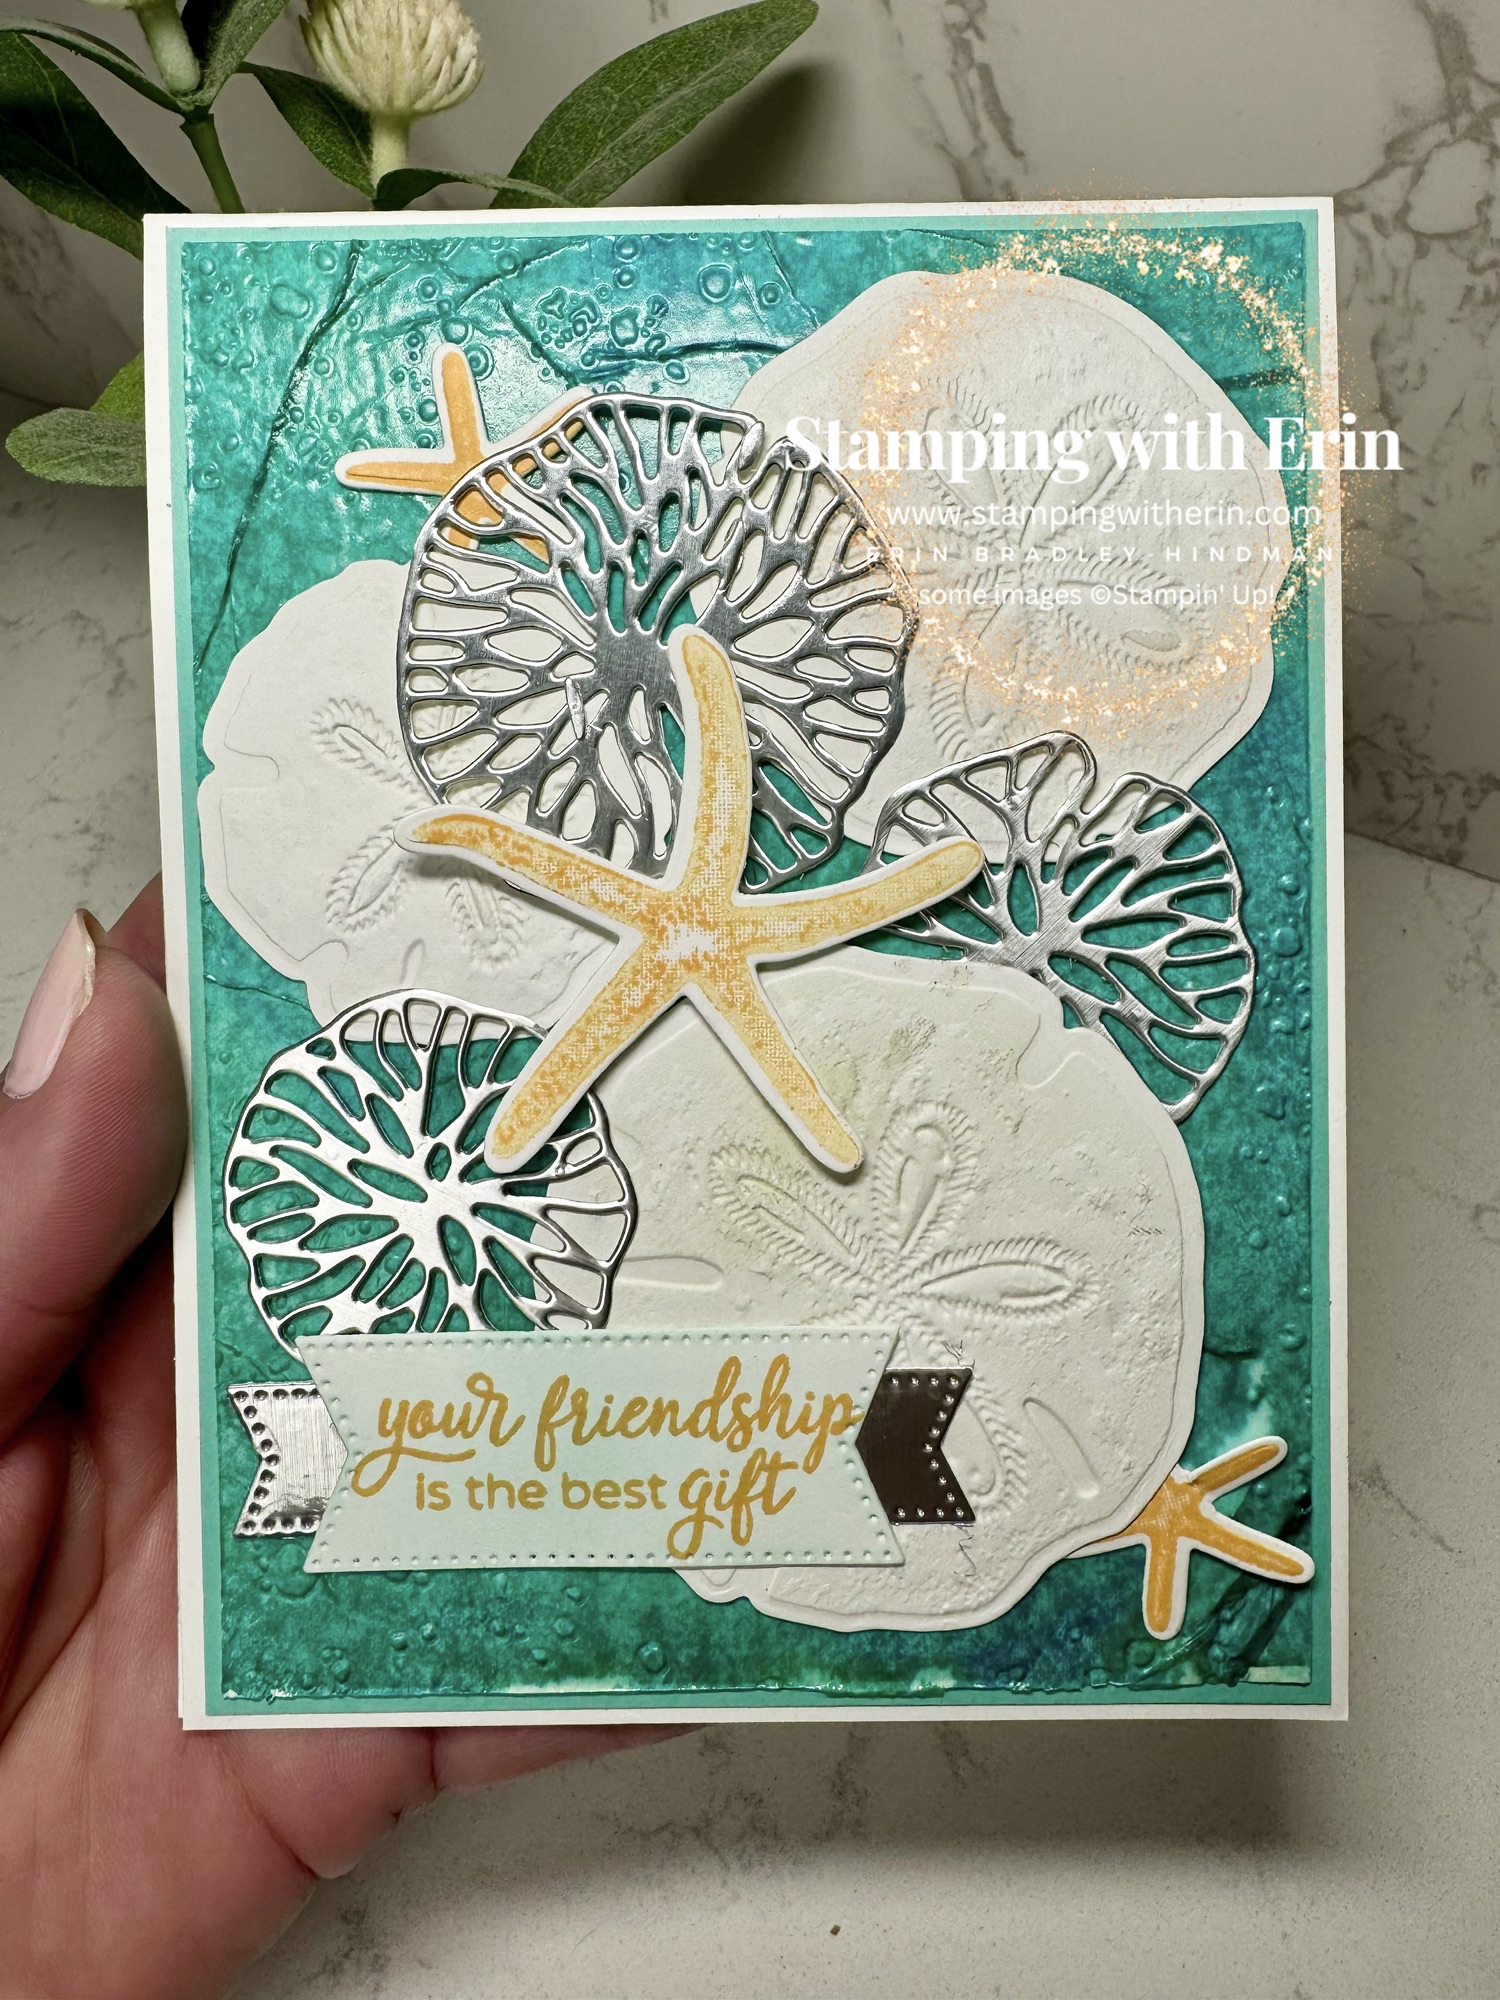
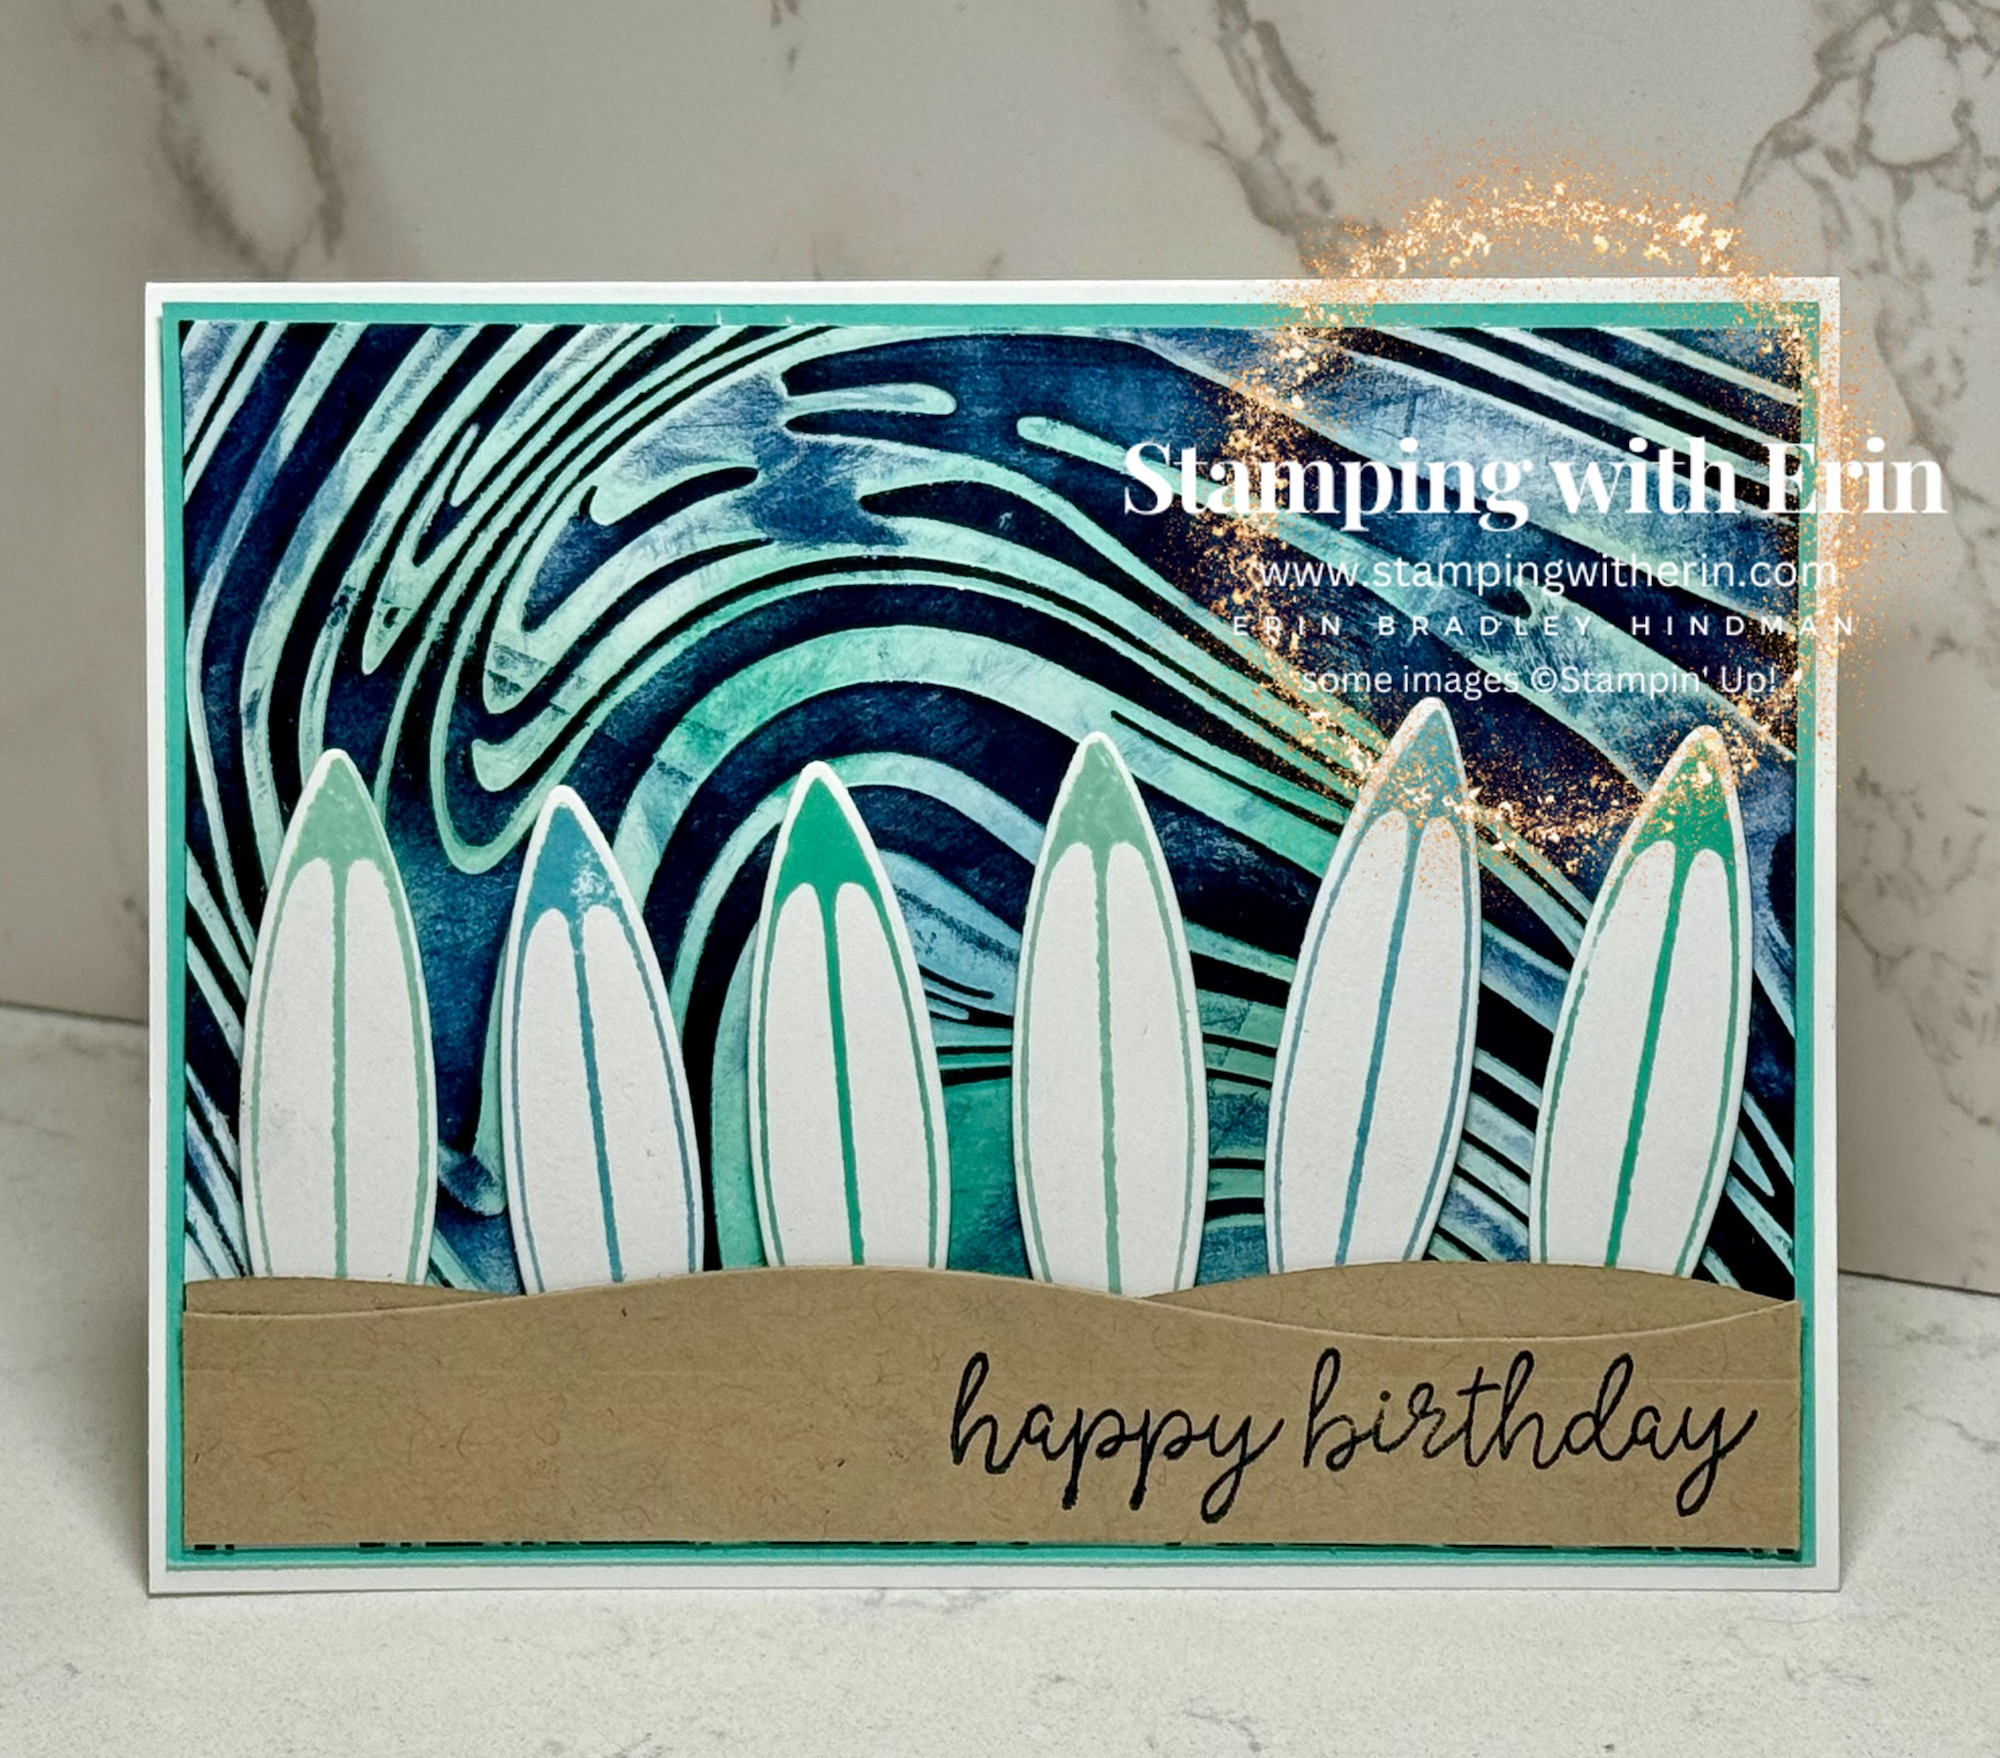
I shared this card during my tissue paper video. It’s one of my favorites!

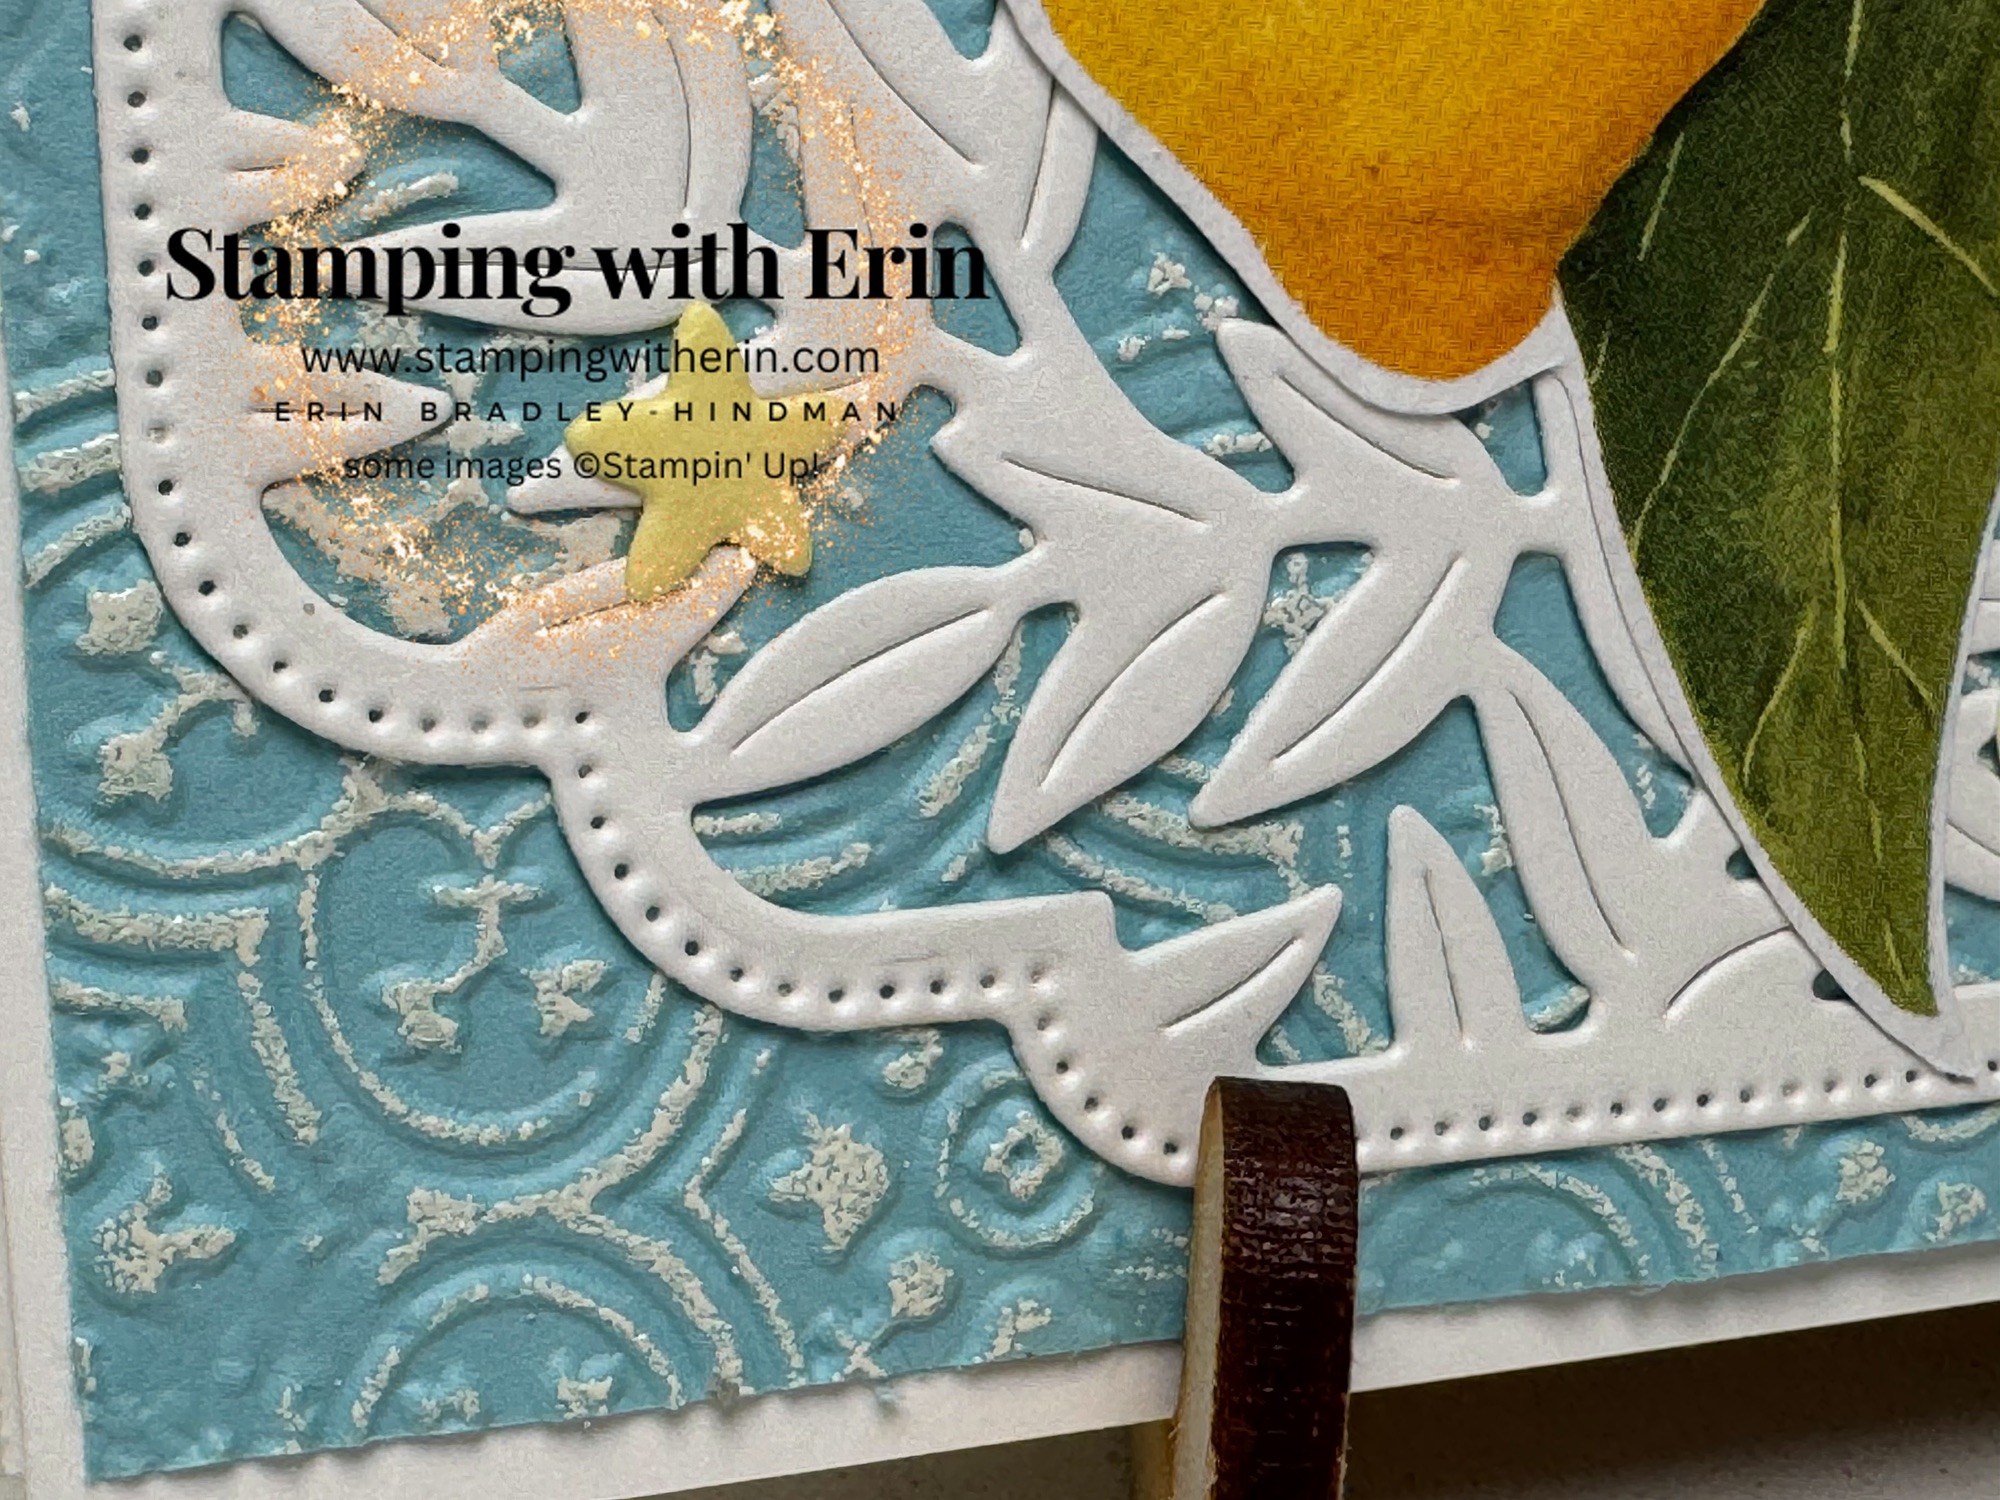
For the background, I used Azure Afternoon, Pool Party and Coastal Cabana. After the tissue paper had dried, I cut it to 4″ x 5/4″ and embossed with the Seaside Wishes embossing folder.

I die cut and embossed the sand dollars with Basic White paper. Using a Blending Brush, I colored them with Basic Beige.

I stamped the starfish wish Peach pie and die cut. The big one is on Dimensionals.

I die cut the others with Silver Foil. On Adhesive Sheets!

I stamped the sentiment with Peach Pie and die cut with Stylish Shapes. I then colored it using Coastal Cabana with a Blending Brush. I die cut another Stylish Shapes with Silver Foil and glued behind the sentiment.

Here’s the video:


Product List

Double Fold Card with Enduring Beauty!


I made this card a few months ago. Finally got the pictures, the supplies I used and here you go!

I stamped the flowers with Memento and then used the masks to color them. I used Petal Pink, Flirty Flamingo and Shaded Spruce. For the center of the flowers, I used the White Enamel Effects with a sponge.

After I cut the card base, I embossed one side with the Distressed Tile embossing folder. I then used my Brayer with Petal Pink to give it some color.


Double fold cards are fun to make and pretty easy. I have PDF instructions on how (under instructions on the left-computer or on the bottom-phone. It’s called Double Fold Card), and two videos on how to do them:


Product List

Many Colors with Tissue Paper! Video!

I decided I wanted to make another card with tissue paper, this time a little different!

The inks for the frame:

Lemon Lime Twist

Garden Green

Old Olive

Peach Pie

Cajun Craze

Daffodil Delight

For the leaf:

Daffodil Delight

Pumpkin Pie

Cajun Craze

Versamark with Bronze Embossing Powder

To see non-SU products that I used on this card, go to “shop” (top menu) and select “must have for crafting”.

THIS PAGE CONTAINS AFFILIATE LINKS. IF YOU CLICK ANY OF THE AFFILIATE LINKS AND PURCHASE A PRODUCT, I MAY EARN A COMMISSION BUT DON’T WORRY, THERE IS NO COST TO YOU! READ MORE ABOUT MY AFFILIATE DISCLOSURE BY CLICKING HERE.

Here’s the video! I made the card a little different.

Product List

 Here’s the card I made in the video.

Inks for the frame:

Lemon Lime Twist

Garden Green

Flirty Flamingo

Real Red

Lemon Lolly

Daffodil Delight

The ink for the leaf is the same as the first card.


Product List

Happy Birthday with a Mediterranean Blooms Lemon!

That beautiful Mediterranean Blooms DSP has several sheets with lemons. No die cuts for that, but they are somewhat easy to fussy cut.

I decided to use Balmy Blue as my background and I wanted it to be embossed. I embossed with the Distressed Tile embossing folder. I wanted the embossed parts to show up more, so I used Versamark with my Brayer and then added white embossing powder and heat set. Wow!

I die cut the frame with Basic White and added some die cut flowers with Lemon Lolly. Glued to the middle of  the card.

I fussy cut the lemon and glued it on top of the frame.

The sentiment is from the Round We Go stamp set. I stamped with Daffodil Delight and die cut with the Stylish Shapes. Glued on top of the frame and the lemon. Added a few clear Opal Rounds underneath it.


Measurements:

Basic White 5-1/2″ x 8-1/2″‘ scored at 4-1/4″

Balmy Blue 5-3/9″ x 4-1/8″

Scraps of Basic White, Lemon Lolly and Mediterranean Blooms.


Product List

Slimline Mediterranean Blooms/Citrus Blooms Card

This suite is so dang beautiful. The DSP has images that can be cut with the dies, which makes the card making fast! I used everything in the suite on this card.

I die cut two triple oranges and one single from the DSP.

I used another one of the sheets for my background. Using the Everyday Detail dies, I die cut the edges of the DSP (with the die that looks like “x’s”) so that some of the Daffodil Delight would show.


I stamped the sentiment from Citrus Blooms with Night of Navy on Basic White. Die cut with the Stylish Shapes.

I die cut two leaves from the Citrus Blooms dies with Old Olive. Tied a big bow with the Linen Thread. Put all of them behind the sentiment.

Added a few Opal Rounds in a few places. Done!

I left the inside of this card blank. I think it could say “happy birthday” or “thank you” or something about friendship etc.

Measurements:

Daffodil Delight 8-1/2″ x7″ scored at 3-1/2″

Mediterranean Blooms DSP 8-3/8″ x 3-3/8″

Scraps of Basic White


Product List

Blackout Card with Night of Navy (instead of Black!) Short Video!


This is a fun technique and is pretty easy!

Here’s my short video on how to do it:


Product List

Enduring Beauty in Daffodil, Olive and Gray!


I decided I wanted to use Enduring Beauty Masks but only 4 of the 5 masks. I love flowers that are white and yellow! You could use any other color!

I stamped the flowers with Versamark on Basic White. Embossed with silver embossing powder.

I skipped mask #1- the one that gives the flowers the most color. I used Daffodil Delight on the other two masks that are for the flowers. I used Old Olive on the leaves.

I searched my DSP and I love yellow with gray.

I stamped the sentiment with Daffodil Delight on White and die cut with the Stylish Shapes.

I added a few rows of Baker’s Twine and then added some embellishment. Pretty fast card!

Product List


Burger, Fries & a Soda!


This card would be great for a kid! On the inside is a mini pocket die for a gift card! It could be for McDonalds, Red Robin, etc!


For the burger, I stamped with Memento and colored with Blends:

  • Bun: Crumb Cake
  • Pickles: Shaded Spruce
  • Tomatoes: Real Red & Petal Pink
  • Lettuce: Old Olive
  • Burger: Bronze and Color Lifter
  • I added cheese but adding some Daffodil Delight coloring.

For the fries, I stamped with Crushed Curry and using a Blender Pen, pulled the color to the inside.

The soda was stamped with Versamark on Pumpkin Pie. I embossed with white embossing powder. I die cut the top and bottom with Silver Foil. I stamped the orange with Pumpkin Pie, then die cut. I die cut the top layer with Pumpkin Pie.

I die cut the tray from Bistro Burger dies with Basic White. With my Pecan Pie Blends, I colored around the edges.

The sentiment is from the Simply Said stamp set. I stamped with Early Espresso on Basic White and die cut with the Stylish Shapes dies. The sentiment on the inside is from Bistro Burger.

Measurements:

Basic White 5-1/2″ x 8-1/2″ Scored at 4-1/4″

Pecan Pie 5-3/8″ x 4-1/8″

Country Woods DSP 5-1/4″ x 4″

Scraps of Basic White, Pumpkin Pie and Silver Foil


Product List

A Rocker Card with 3 Planes!

The Rocker cards are EASY to make.

Take a standard size card base (5-1/2″ x 8-1/2″ scored at 4-1/4″), fold and use your bone folder to make the fold crisp. Take the 2nd largest Deckled Circles die, place on top of folded card base. Make sure the folded edge of the card does not have the die on it; the die should hang over the edge. Die cut.


For the background DSP, I used the 3rd largest Deckled Circles die. Die cut the same way, the die hangs over the top edge of the DSP.

For the planes, I stamped all three with Memento on Basic White. I colored with Boho Blue, Mossy Meadow, Smoky Slate and Bronze Blends. I die cut and added them to the card with Dimensionals.

I stamped the “happy birthday” on Basic White with Boho Blue ink. Die cut with one of the Adventurous Sky dies. Glued to the card with Multipurpose Glue.

I added three Industrial Trinkets using Glue Dots. They are the perfect size.

Here’s my Rocker Card rocking!


Product List