Blue & Green Sparkly ADVENT Calendar! Video!


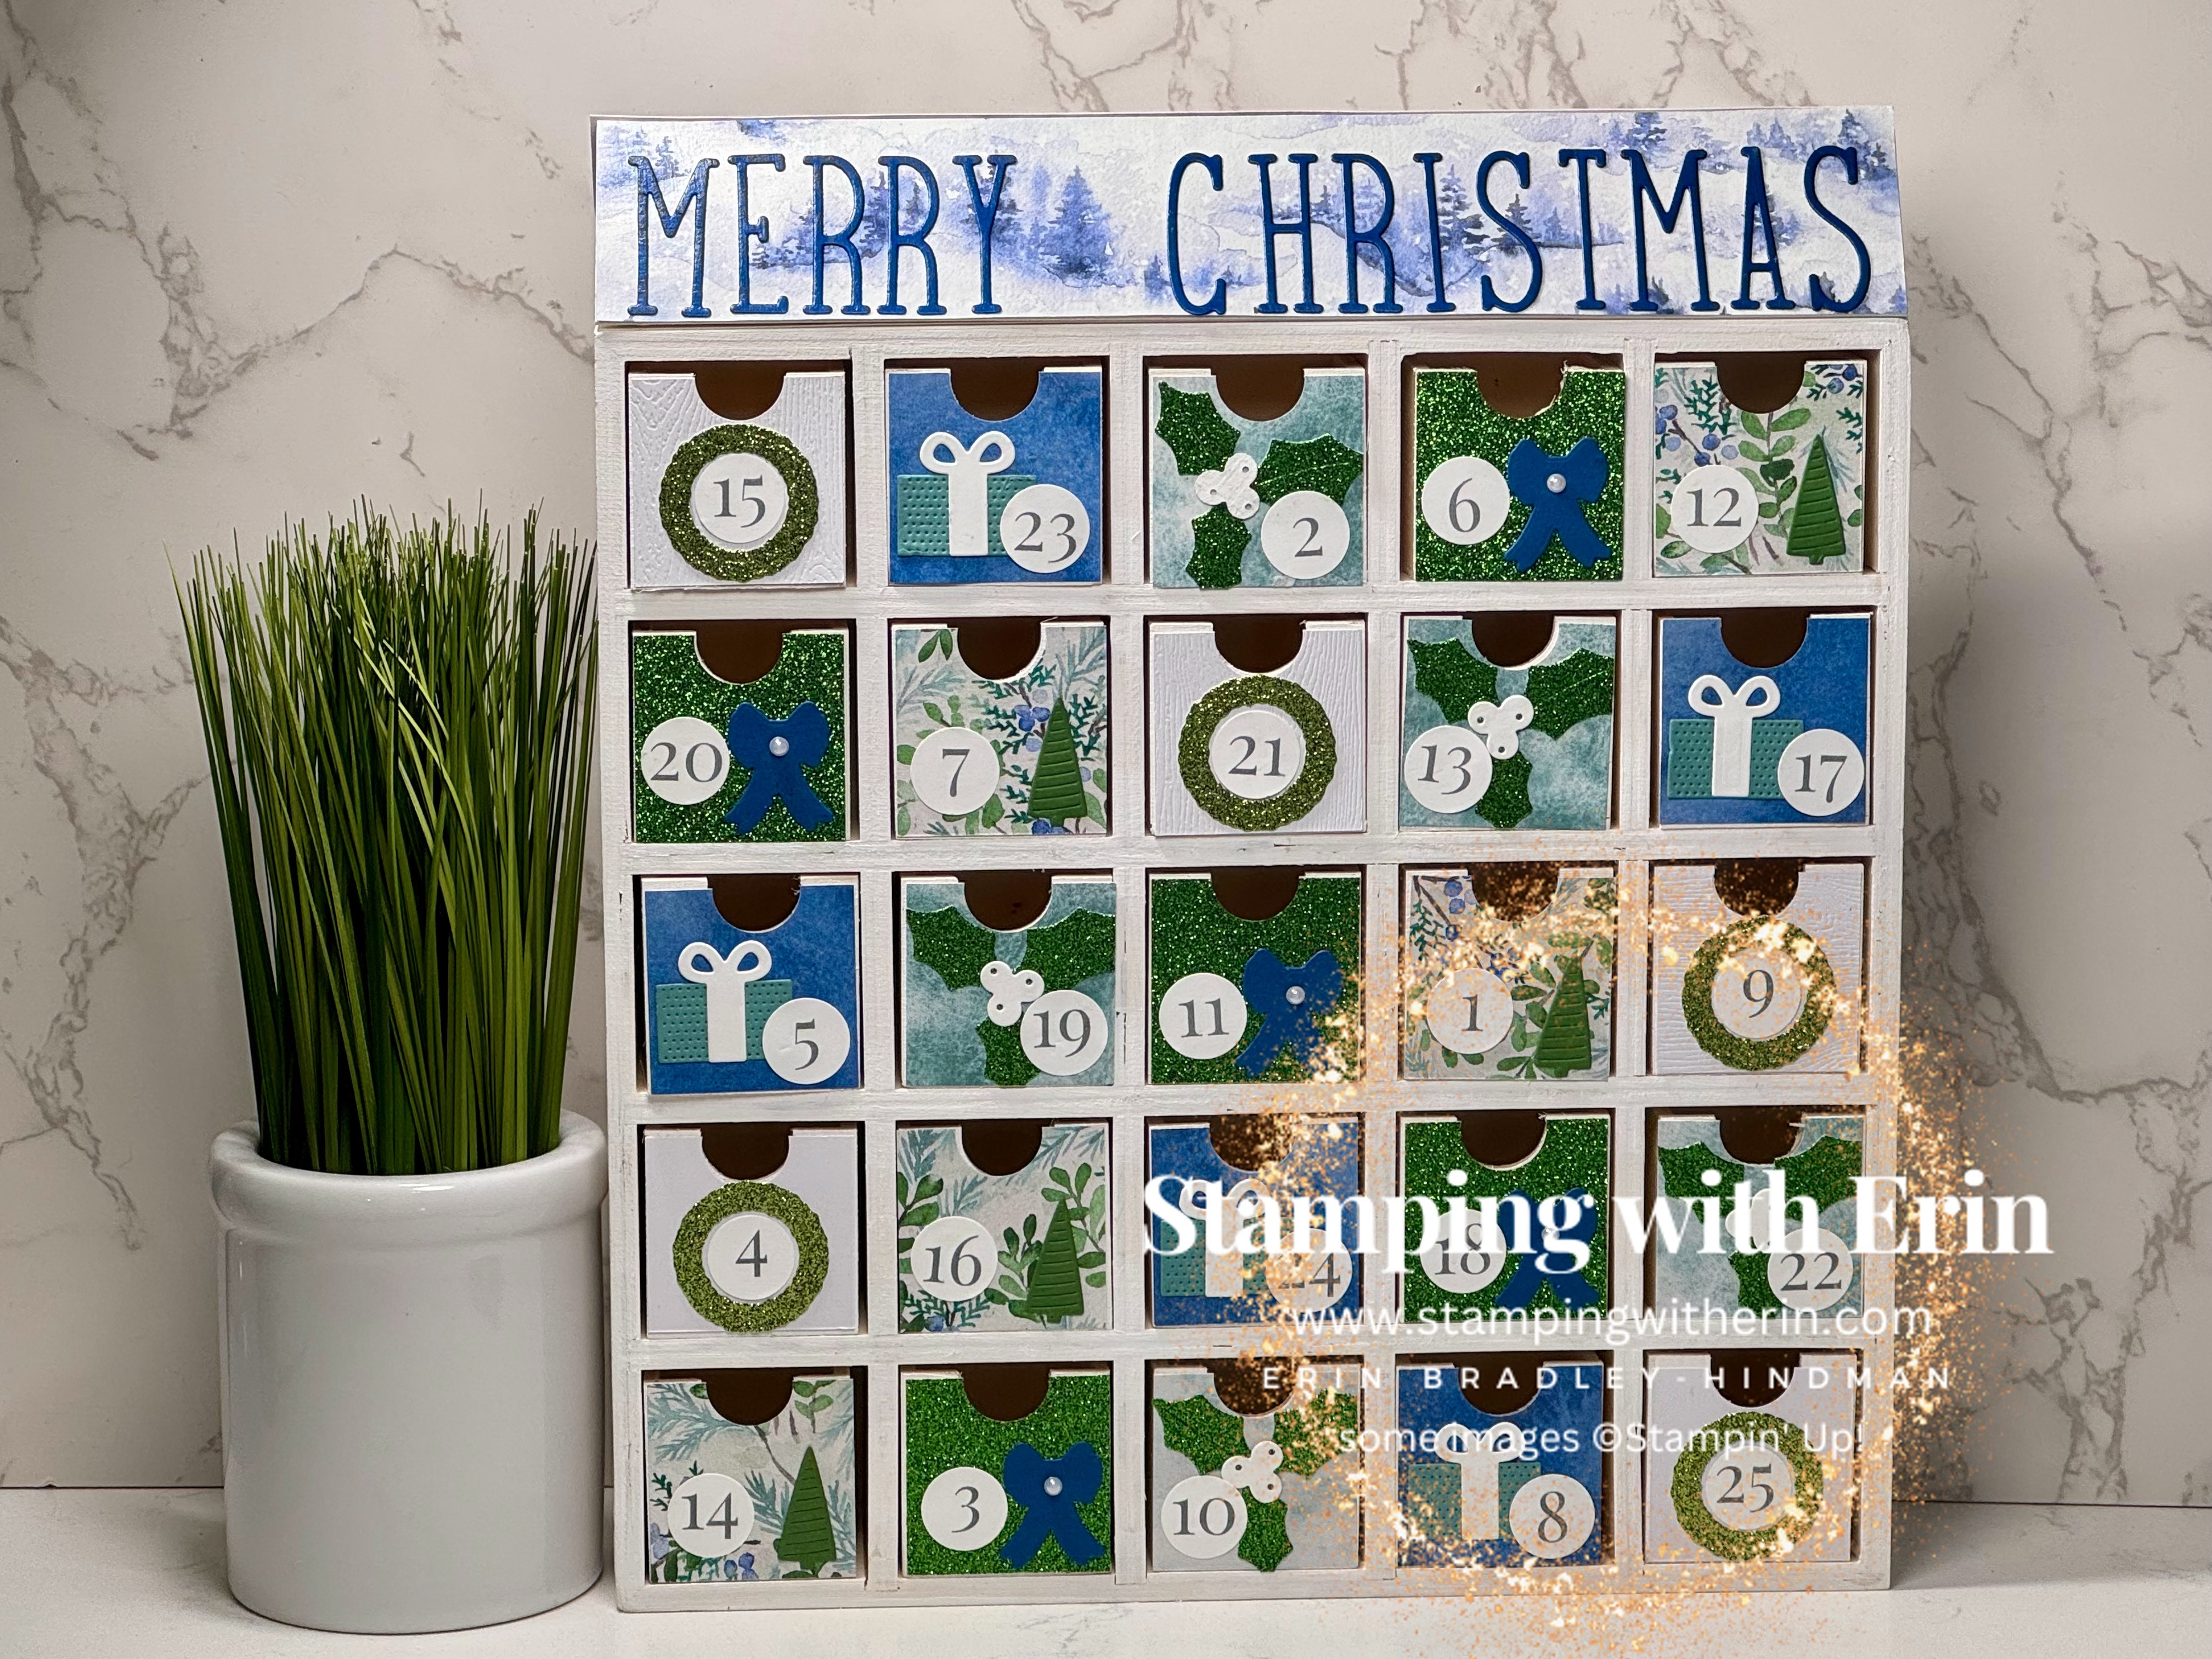
I finally made the video for this pretty advent calendar!


Here’s the advent calendar I used (just click on the picture):


Square Advent Calendar


I have a kit for this project. It includes all the paper, die cuts, numbers, instructions:

Blue & Green Advent Calendar Kit

I also have a PDF Tutorial for making this:

Blue & Green Advent PDF Tutorial

And, I also have the numbers available for purchase:

Numbers for Blue & Green Advent Calendar

Product List

THIS PAGE CONTAINS AFFILIATE LINKS. IF YOU CLICK ANY OF THE AFFILIATE LINKS AND PURCHASE A PRODUCT, I MAY EARN A COMMISSION BUT DON’T WORRY, THERE IS NO COST TO YOU! READ MORE ABOUT MY AFFILIATE DISCLOSURE BY CLICKING HERE.

A Big Tree! Slimline Card!


I wanted to make a tree that looked like the trees from The Grinch. Except I wanted it to be straight, not bending at the top. The Merriest Trees dies are great for making all different sizes of trees!

I die cut the largest tree twice. The next largest size twice. The next size three times. I just arranged them until I got them to look like I wanted. All with Granny Apple Green cardstock. I used my Blending Brush with Granny Apple Green ink to add a little color on the edges.

I glued the trees together (just put glue on the bottom of each tree when arranging. Once dry, put glue all over the back to glue to the card base).

I added tons of Basic Rhinestones. I colored them with the Poppy Parade, Melon Mambo and Granny Apple Green Blends. I used the light and dark of all three.

The sentiment is from the Merriest Trees stamp set, I stamped with Shaded Spruce on Basic White. I fussy cut into a rectangle. Added on top of the tree with Dimensionals.

The tree base is with Silver Foil.

The background paper is from the Merry Bold & Bright DSP.

Measurements:

Granny Apple Green 8-1/2″ x 7″ Scored at 3-1/2″

Merry Bold & Bright DSP 8-3/8″ x 3-3/8″

Lots of Granny Apple Green for the tree

Scraps of Silver Foil for the Base

Scraps of Basic White for the sentiment

Don’t forget I have 4 other cards using the Merriest Trees. I will not share them anywhere except in the PDF Tutorial. It includes pictures, measurements, all products used and step by step instructions. You can see it here.

All my PDF Tutorials can be seen here!

Product List

3 Merriest Trees on a Double Fold Card! Video! New PDF!

I made a Double Fold card with the motorcycle on it earlier this year. I looked at the Merriest Trees and decided I wanted to make another one- a little different.

Here’s the inside:

And here’s a short video of the card being opened:

Here’s my video making it- and you get to see the 4 cards I have in the Merriest Trees PDF Tutorial!

Here’s all the measurements for this card- you can also see the PDF for the Double Fold Card under my “instructions” on the right side or on the bottom from a phone.

Card Base: 5-1/2″ x 11″ Scored at 4″ and 8-1/4″

Snow DSP: 3-3/4″ x 5-1/4″

Balmy Blue Shimmer: 5-3/8″ x 3-7/8″ Die cut with the Deckled Rectangles dies to make a frame.

Shaded Spruce Shimmer below trees: 5-1/2″ x  3/8″

Snow DSP inside the card below the trees: 1/4″ x 5-1/4″

My motorcycle card can be seen (the video is in the post) here

The Merriest Trees PDF Tutorial can be seen here

All my PDF Tutorials can be seen here

My Instructions can be seen here


Product List

Autumn Leaves- Grateful for a Friend Like You- NEW PDF!

The All About Autumn suite is so dang pretty. One of the best papers I’ve ever seen! This card took me about 10 minutes.


Measurements:

  • Copper Clay 5-1/2″ x 8-1/2″ scored at 4-1/4″
  • All About Autumn DSP (for the background) 5-3/8″ x 4-1/8″
  • All About Autumn DSP (the green one) 5/8″ x 4-1/8″
  • Scraps of Very Vanilla
  • Scraps of Pecan Pie
  • Scraps of All About Autumn DSP (for the leaf)

Step by Step:

  • Die cut the leaf with the DSP paper.
  • Die cut the midrib (the middle part of the leaf) with Pecan Pie cardstock. Glue to the leaf.
  • Glue the 5/8″ DSP on the bottom right of the background DSP.
  • Stamp the “with a grateful heart” on the DSP background paper with Versamark. Emboss with gold embossing powder. Heat.
  • Stamp the “to have you as a friend” on Very Vanilla with Copper Clay ink. Die cut with one of the Autumn Leaves dies. Glue below the grateful heart sentiment.
  • Add the leaf to the card with Dimensionals.
  • Add the Speckled Dots.


OK, when I first got this suite out to make stuff with it, I struggled a little. I just couldn’t come up with ideas. Then! I came up with tons! I have a few I’ll share with you, but I also have 4 that I will not share anywhere and have a PDF Tutorial for them! You can see it HERE

All my PDF Tutorials can be seen Here

Let me know if you have any questions!


Product List

Candy Corn that Glows in the Dark! A New PDF! Tricks & Treats!

Tricks & Treats  (page 50) is really dang cute, but I found that I just couldn’t come up with ideas. Until this weekend, I made 8 cards with it!

I love candy corn. Not just to eat it (which I REALLY love), but I think it is always so cute!

The dies in Tricks & Treats has lots of stand alone dies. The candy corn is one of them! There are 3 candy corn dies- the whole body, the top and the bottom.

For the body, I die cut three in Pumpkin Pie and two is Fresh Freesia.

For the bottom, I die cut three in Lemon Lolly and two in Gorgeous Grape.

For the top, I cut all 6 with Glow in the Dark paper.

The bottom is Crumb Cake, embossed with the Timber embossing folder, then with a sponge dauber, I added some Versamark to some spots to give it a distressed look. I die cut the top with one of the Tricks & Treats dies.

The ribbon is the Black & White Gingham ribbon. I colored it with Pumpkin Pie and Fresh Freesia Blends.

“Happy Halloween” is a stamp from Pick of the Patch (page 51). I stamped with Pumpkin Pie and die cut with Stylish Shapes.

The background is embossed with one of the Basic 3D embossing folders.

The sparkly stuff is two things: the purple is the Tinsel Gems three pack. The orange and yellow is Rhinestone Basic, colored with Lemon Lolly and Pumpkin Pie Blends.

Now, I made a PDF Tutorial using the Tricks and Treats. 4 cards, some of which are my favorites! You can see that PDF here

You can see all my PDFs here

Check back tomorrow for the full supply list!


Product List

Did you know? I have PDFs for sale!

I started making PDFs of cards I made that I haven’t posted. And I won’t post them anywhere. I made 4 for 3 different stamp sets. As of now, I have:

Gone Fishing- the cards I’ve made with this suite is one of my most popular!

Let’s Go Shopping- this was a suite I didn’t know if I would order. I did, and I struggled with it for a while. I then got tons of ideas and I figured I wasn’t the only one who struggled with it!

Reach for the Stars- I think as of right now, this is my most popular. I have made three cards that people seem to really like! So, I made 7 more. 4 of them can only be seen in the PDF!

The new mini catalog starts soon and I’ll have a ton more for that!

The PDFs include pictures, measurements, supplies used and step by step instructions! You can see them all here.

If you would like to see another stamp set/bundle/suite used for these PDFs, let me know! Let me know if you have any questions!