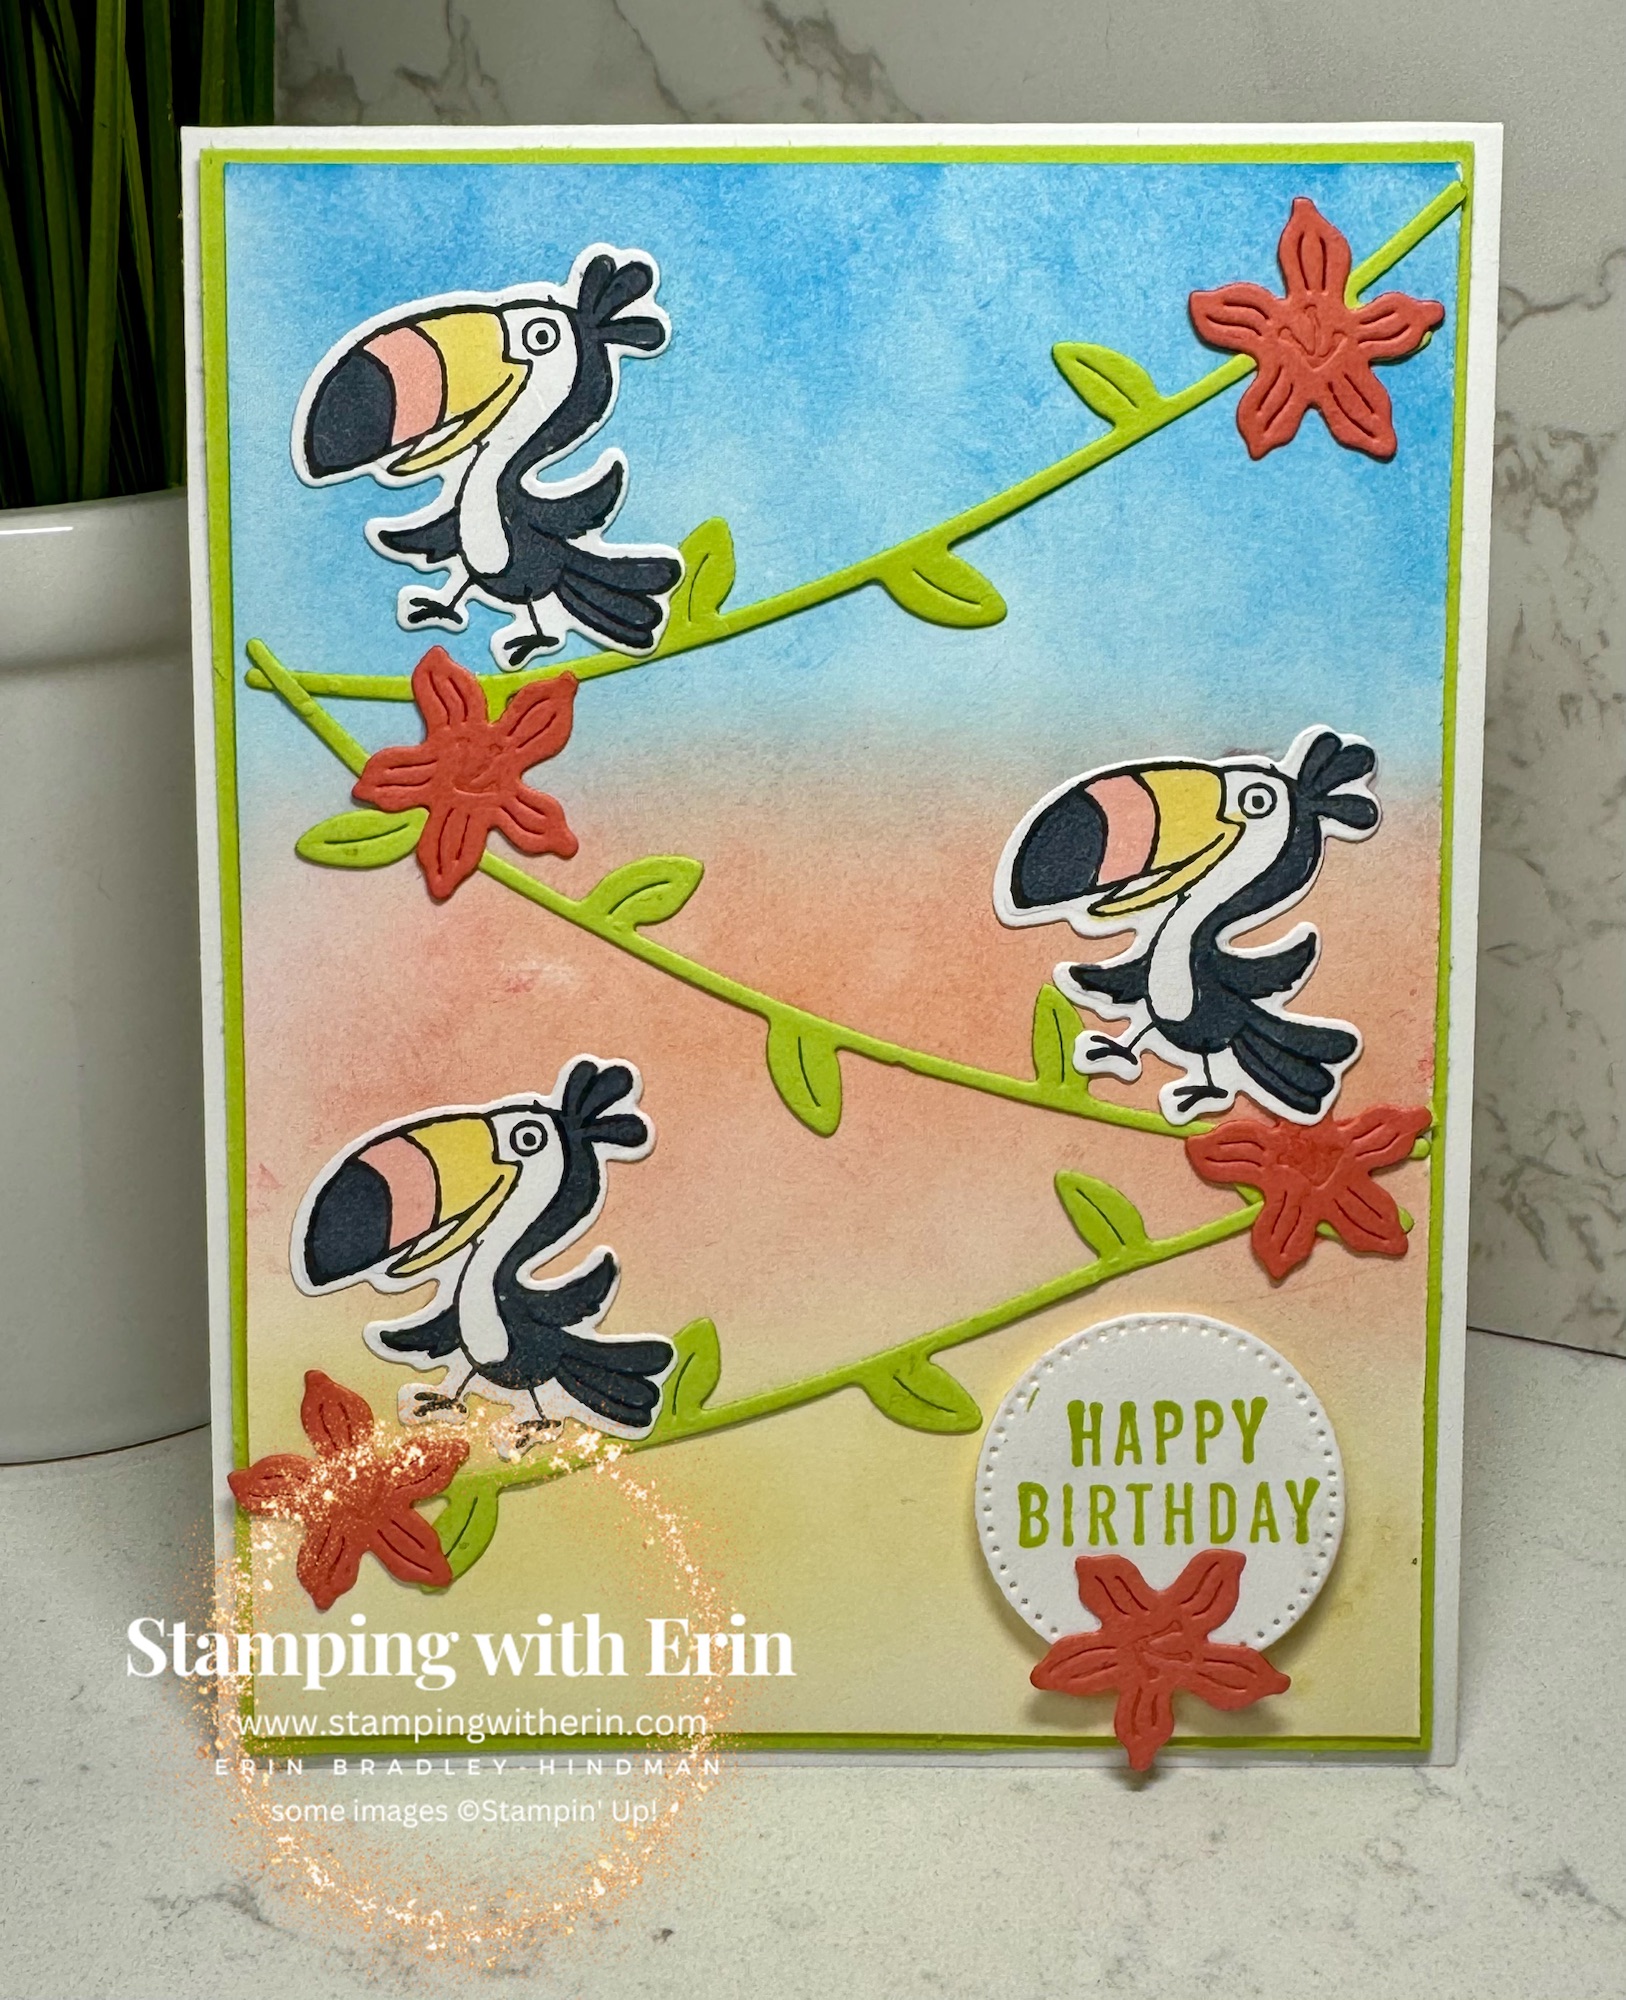
How about a Long Card? Video!

This card is 15-3/4″ x 4-1/4″! It’s pretty easy to make!

The CEO of Stampin’ Up! made a long card a few months ago. I loved the idea so I came up with one of my own! There’s a PDF with the measurements- I’ll give you the link to it the end of the post.

Here’s the video of making it! It’s really easy!


Here’s the card I made during the video- all supplies are the same!

In the video, you’ll see the four other Reach for the Stars/Stargazing cards I made that I won’t share. You can purchase the PDF Tutorial that has pictures, measurements, supplies and step by step instructions. I have other PDF Tutorials! Check them out here!

Here’s the link for all my instruction PDFs, this one is the last one shown: “Long Card”:

Instructions


Product List


House with Balloons! Video!


I made a house from two stamps from the Let’s Go Shopping! These stamps are meant for shops, but I figured a way to make a house.

Here’s my video:

In the video, you’ll see four more cards using the Let’s Go Shopping. I won’t share those anywhere, but you can get the instructions that include pictures, measurements, all supplies used and step by step instructions. I also have one for Gone Fishing and am working on others.  You can see them here:

PDF Tutorials

Using the Basic Black Write marker, I colored the big shop stamp everywhere except the window and the door sign. I then used the top shop stamp to color just one window and stamped it on the “house” next to the door. Die cut and then colored with Lemon Lolly and Calypso Coral Blends.

I die cut a square from the Stylish Dies and then cut it in half. I embossed with the Timber embossing folder.

I die cut the “chimney” from the Let’s Go Shopping dies with Cherry Cobbler. Embossed with the Exposed Brick embossing folder.

I die cut the window overhang with Basic White and embossed with the Geometric embossing folder.

I used my Blending Brushes on a 5-3/8″ x 4-1/8″ piece of Basic White with Lemon Lime Twist and Balmy Blue.

There are 13 balloons. I used the Beautiful Balloons dies- the smallest balloon. After die cutting, I used the Wink of Stella on each one. Here’s the colors I used:

Daffodil Delight

Crushed Curry

Pumpkin Pie

Lemon Lolly

Pool Party

Blueberry Bushel

Tahitian Tide

Poppy Parade

Bubble Bath

Melon Mambo

Granny Apple Green

Soft Sea Foam

Lemon Lime Twist

I used baker’s twine from the Sentimental Rose card kit. It is not as thick as the Baker’s Twine you see in the catalog. I glued one to each balloon. I gathered them together at the bottom and added a bow with the Simply Elegant Trim.

I stamped the sentiment with Memento on Basic White. I die cut it with one of the Let’s Go Shopping dies. I used a Blending Brush with Balmy Blue ink to give it a bit of color.

Let me know if you have any questions!


Product List

Happy Birthday with Grapefruit!

So Refreshing is a great bundle, the stamps are so pretty and the dies are awesome!

Since the stamp has fruit, I decided to make my background with the Sweet Citrus embossing folder. I used Lemon Lolly cardstock (5-3/8″ x 4-1/8″).

I stamped the pitcher and the glasses with Gray Granite. For the inside, I inked with Calypso Coral and stamped off once before stamping the inside. I wanted it to be a little lighter.

I stamped the fruit with Calypso but did not stamp off. I wanted them darker.

For the picnic blanket, I used Petal Pink and die cut. That’s what’s great about the So Refreshing dies- tons of dies that work on their own!

I stamped the sentiment on Basic White with Calypso Coral. Die cut with the Stylish Shapes dies.

I added a little bit of ribbon below the sentiment. It’s from the Sheer Ribbon pack.

Such a fun and pretty birthday card!


Product List

Triple Easel Card with the Zoo Crew! Video!

I found old instructions in my pile of instructions for an easel card. I hadn’t made one in years! With the DSP sale going on now, I thought this was a great time to show you how to do it. All three cards in my video use a lot of DSP! And they’re all on sale!


These cards will fit into a regular size envelope, but they will weigh a little more so shipping might be more.

I make this card from start to finish in the video. I made a PDF of all the measurements. Here it is- but don’t forget, you can look at all my instructions under “instructions” on the right side. Or on the bottom from a phone.


Most everything on this card is from the Zoo Crew DSP: the animals, the flower paper and the black & white paper. The Lemon Lolly striped paper is from the Bright & Beautiful DSP.

I used the Zany Zoo dies on this card: the animals, the sentiment, and the scallop edge on the top easel.

For the flower DSP, I decided to add a little more color to it. Using the white Pearlized Enamel, I put a dot in the middle of each flower. Let it dry, then colored it with my Lemon Lolly Blend.

Here’s everything I used. Let me know if you have any questions!

Product List

How about a Dancing Astronaut?

Well, maybe not dancing, but on a Craft Spring (wobble) so it shakes!

Here’s a 3 second video to see what I mean:

This card was quick. I stamped the astronaut with Staz-On on the Holographic paper and die cut it.

The background was made with the Patchwork Pieces dies and Stargazing paper. I cut a piece of Tahitian Tide (5-3/8″ x 4-1/8″) and then adhered the Patchwork pieces to it. Basically, start with each corner, then add the middle ones about the same distance from each other.

The planet was die cut with the Holographic paper. The rings were cut with Tahitian Tide cardstock.

For the sentiment, I used the “Happy Birthday” from Hello Kiwi. I used my Write Marker in Blackberry bliss and just colored “appy” and “irthday”. I then die cut the “H” and the “B” from Alphabet a la Mode. Made the sentiment stand out!

I adhered all that and then put my astronaut on with the Craft Spring. Cute card!

And! I have four more cards using Stargazing/Reach for the Stars! I won’t show them on here, but you can purchase a PDF tutorial. It includes pictures, measurements, supplies used and step by step instructions! I have PDFs available for other stamp sets, too. Here’s where you can see them!

Product List

Reach for the Stars! Astronaut says Happy Birthday!

If you watched my video of my new stuff (the most recent one), I showed the Stargazing Suite. It includes Reach for the Stars stamp set, Reach for the Stars dies, Stargazing DSP, and the Holographic Trio Speciality Paper. All four of those are used on this card!

In the video, when I showed the Holographic paper, you could see how it looks when a light is on it. It becomes rainbow-y! It’s hard to take to picture of it!

This card took me about ten minutes. That does not include letting the Staz-On dry. When stamping on the Holographic, you have to let it set for a while to dry.

I stamped the astronaut and the sentiment on the Holographic with Staz-On. The sentiment is from Phrases for All. I die cut it with Deckled Rectangles dies.

So everything on the front of this card, except the background paper (which is Stargazing DSP), is with the Holographic paper. I think a kid would really like this card!

And! I have four more cards using Stargazing/Reach for the Stars! I won’t show them on here, but you can purchase a PDF tutorial. It includes pictures, measurements, supplies used and step by step instructions! I have PDFs available for other stamp sets, too. Here’s where you can see them!


Product List

Skating Chucks!

I wanted to use every chuck on this card. To fit them all, I had to make a slimline card. I’ll have the dimensions and colors used below.

Slimline cards are 8-1/2″ x 7″. The 7″ side is scored at 3-1/2″. For the card front, my size is 8-3/8″ x 3-3/8″. SU doesn’t sell envelopes for these anymore, but these cards do fit in a #10 envelopes- the usual size for regular mail. They are 4-1/8″ x 9-1/2″.

Enough math! 🤣 Let’s talk about the coloring.

The only paper used on this card is Basic White. I colored the card front with Azure Afternoon with a Blending Brush.

For the hills, I used the Basic Borders dies and cut two pieces with Basic White. I colored them with Lemon Lime Twist ink with a Blending Brush. I slightly layered one over the over and adhered at the bottom of the card.

For the chucks, I colored them with Blends. Main parts of them are Lemon Lolly, Balmy Blue, Granny Apple Green and Calypso Coral. For their eyelids, I used Crumb Cake. For their beaks, I used Petal Pink. For the wattles and the one tongue, I used Cajun Craze.

Their skateboards are Balmy, Lemon, Granny, and Calypso. The bottoms and the wheels are Smoky Slate.

Cakes are Balmy, Lemon, Granny, and Calypso.

The sun was die cut with Basic White and I colored with Lemon Lolly with a Blending Brush. I made it very light.

A very bright card- perfect for a kid!


Product List


Pink Happy Birthday Card- NO Stamps!

Everything on this card is new except one thing- the embossing folder I used.

I really love the Patchwork Pieces dies- I have so many ideas! For this one, I used the Bright & Beautiful DSP for the Patchwork. I also die cut the top balloon with the DSP.

“Happy Birthday” is from the Wanted to say dies. I die cut one layer with Bubble Bath, the other with Berry Burst. I cut the back layer so that I could arrange the words a little different.

For the frame (I die cut the Patchwork from the Bubble Bath so I could layer the pieces from Bright & Beautiful DSP evenly) I embossed with the Painted Texture folder.

So, no stamps on this card! That happens every once in a while.


Product List

How about some PINK Birds?

The color change came with some really pretty new pinks. I hadn’t used any of them yet, so I decided to make a birthday card that would be good for a woman!

Again, used Bird’s Eye View stamp set, this time birds with no glasses. I colored all them with Berry Burst, Bubble Bath and Fresh Freesia. Their beaks and the tree limb are Crumb Cake.

The sentiment is from the Hello Kiwi stamp set.

I die cut the “H” and the “B” from Alphabet a La Mode with Berry Burst cardstock.

The background paper is from the Bright & Beautiful DSP- 5-3/8″ x 4-1/8″.

To make the Fresh Freesia frame around the background, I took a piece of 5-3/8″ x 4-1/8″ of Fresh Freesia and die cut it with the largest Deckled Rectangle dies. Glued it on top of the DSP.


Here’s everything I used:


Product List